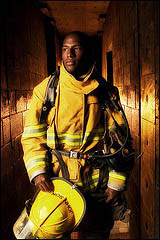
 In producing a series of portraits for Gwinnett Technical College in Lawrenceville, GA, Strobist reader Keith Taylor chose to use a two-light-zone setup, including gelled backgrounds, to create visual continuity over a series of photos.
 The series is a good example of how lighting design can create a unifying theme for portraits shot at different times, with different subjects, and/or in different locations. I want to take a look at his fireman trainee portrait as an example, but you can see his entire Gwinnett Tech set as a slideshow here.
(More on making the fireman shot after the jump.)
Not Scared of the Dark
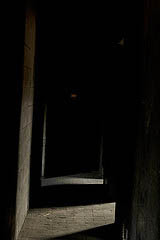
 Here's the setting, a place that would make many newer, available light-oriented photographers cringe. And Lord help you if you are only sporting on-camera flash. But someone who is comfy with lighting -- especially working background flash against foreground flash -- will quickly see how to make good use of the dark environment.
A dark room is a very efficient canvas on which to add light, because you can do a lot with a little. The reason is that you do not have to overcome high, pre-existing light levels to get the effect that you want. In fact, one of the first things I will do when planning light for a room is to see if I can turn the ambient light off.
Not to say that Keith wanted to ignore the ambient light -- far from it. He chose his aperture/shutter combo to correctly expose the ambient coming in on the floor at bottom right. This will help to separate the camera right hand and camera right leg from the background.
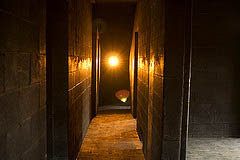
 The first light he adds is a Vivitar 283, aimed right back at the camera and gelled with two CTOs to get a super-warm look to the background.
 (Cue the Beavis voice: "Heh-heh.. Heh-heh... Fire.. Heh-heh...)
With one flash and two gels, he has taken a long, dark hallway and connoted fire. Why two CTO's? Because one would not be enough for the look he wanted, which was vibrant, off-the-scale warm. You can stack them, you know.
The light is flaring back into the camera, but that's okay. Because Mr. Firefighter Trainee is going to block it in a moment.
Keith already has a working aperture (whatever it happens to be is pretty arbtrary) pulled from the no-flash available light exposure needed to make the continuous-lit floor section correctly exposed. Let's stop here for a moment and see how he could control his flash without leaving the camera.
A Thinking Photographer's Remote Control
Say the flash is a stop too hot and Keith needed to dial it back down one stop for the effect that he wants. Let's also say, for the sake of discussion, that his chosen ambient exposure is 1/15th at f/4. What could he do to only adjust the exposure of the background flash without leaving the camera?
Well, the flash cares about the aperture, and it is one stop too hot (in our little hypothetical scenario) at f/4. So, to knock it down a stop, all you have to do is to expose the scene at f/5.6, right? But moving to 1/15th at f/5.6 is gonna drop your ambient floor tones down a stop, too. So, to compensate for the fact that we have bumped the aperture from f/4 to f/5.6 to knock the flash down, we also change the shutter from 1/15th to 1/8th of a sec.
Now, with a quick settings change, the floor is getting exactly the same exposure (1/15th @ f/4 = 1/8th @ f/5.6) but the flash's exposure has been lessened by one stop. Neat, huh?
I'm telling you: You do not get a physique like mine by unnecessarily walking all the way down that hall to adjust a flash. I'll dial the front flash up or down as my final exposure tweak. It's only a few steps away.
(Now, where are those donuts we got to fuel the day's shoots?)
Remember, to check your background flash light level to see if it even needs adjusting, you would simply turn your hand into a stand-in for the firefighter and hold it between you and the background flash. (I use the hand model thing a lot.) This way you see how the light will look wrapping around a gobo/subject, as it will be in the final image.
(You know you did it, Keith. Where's that photo!)
Now, Light the Front
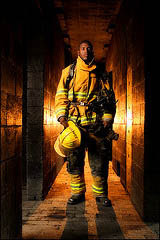
Next, you add your firefighter and adjust the power output and/or distance of the foreground flash until he he is correctly exposed at your chosen shutter/aperture combo. (But all that really matters for this part is the aperture.) The foreground flash, BTW, is another Vivitar 283 shot into a 60" umbrella at camera upper left.
 Here's another frame from the shoot. You can also see where he is hiding the front flash -- in the camera-left doorway. I actually like this one better than the tighter version up top. I think it has more of a "hero" connotation. (What do you guys think?)
But that is just a subjective choice. What is not subjective is the fact that that Keith clearly knows how to create and control an environment with just a couple of 283's.
(Thanks much for the process shots, Keith.)
_____________________________________________
Related reading - On Assignment: Second Light Creates Tension
Do you have a cool, lit shoot for which you also made process/setup shots? Hit us with a link in the comments.
No comments:
Post a Comment