Friday, June 29, 2007
Nikon CLS Tutorial Video
The headline pretty much says it. This three-minute video shows you the basics on quick-and-dirty wireless TTL operation with a Nikon SB-800 and a pop-up flash CLS-enabled camera.
This guy uses a D200, but there are several other Nikons that work in a very similar way.
And remember, you can use CLS to merely trigger the strobe in the manual mode, if you want to do your own driving.
I'm just saying.
DIY Collapsible Soft Box, Part Deux
 Strobist reader Marc Englund is is at it again.
 We reported on his first-generation DIY collapsible softbox back in October. That one was made out a bug shield.
Version 2.0 (pictured) is made out of kite parts, which we think is pretty darn cool. Marc has detailed instructions (with lotsa pix) here. And there's also a discussion about it on the Strobist Flickr threads.
Marc made his for 20 Euros (about $27.00.) But if you are Mr. Moneybags, you can get a commercial version for less than $60.00, along with lots of other flashy goodies.
UPDATE - Bad news: The above source for the store-bought version is USA only. Good news: Marc has listed some other sources in the comments section.
Thursday, June 28, 2007
Got Me Thinkin': Asymmetrical Strip Bank
 Pop Photo's 2007 awards for lighting gear are out. Sadly, the Strobist $10 macro studio was left at the altar.
 (Was it the build quality? I promise I'll use more tape next time...)
But among the things that did get noticed was the Westcott Bruce Dorn Asymmetrical Strip Bank. The lengthily named strip light is brighter up top than down below, offering automatic feathering for full and 3/4 length portraits.
Not going to run out and buy it, because
Kinda neat, actually.
_____________________________
Pop Photo's Article
Westcott's site
A Magic Disappearing Act
 From your reports, I had assumed that the Light Science and Magic books were running in short supply. I talked to Moishe at MPEX today, and he confirmed that (a) they have pretty much dried up, and (b) are not expected back until early August.
(D'oh!)
Moishe scrounged about 25 of them by
UPDATE: Michael tells us in the comments that Amazon has gotten some back in since this post was written, too. Cool beans.
OT, But Cool: One Year of Esquire for Less Than a Gallon of Gas
 Yeah, this is OT, but bear with me. It's too good to pass up. Esquire Magazine is one of my two absolute favorite magazines in the world.
 (My other favorite mag is Wired, which you have heard me yammer on about before in this post about photographer Dan Winters.)
Esquire is consistently a great read. Good photography, used well. Funny, literate, alternately sophisticated and down-to-earth. It is basically a monthly instruction manual for being a guy.
Here's another thing I like. They take a lot of chances with new ideas and approaches. So much so that they occasionally fall on their face. It's an admirable quality (the former more than the latter) and one that is rare in the magazine world.
Yeah, there's girls in there, too. (Hi, Angelina...) But that is sufficiently restrained as to carry an appropriate Wife Acceptance Factor. In fact, the missus reads it every month, too. And she has lamented the fact that there is not really a women's magazine equivalent of Esquire.
But here is why bringing it up: Amazon has just stuck it up on the $5.00 instant rebate rack, which drops the price down to $3.00, or just 25 cents an issue.
So, take my advice and forego a cup of coffee today and get Esquire for a whole year instead. You won't regret it. Just hurry up, as the offer expires tomorrow.
(Sorry to dis the international readers again, but this one is U.S. only, too.)
You Choose '08 Spotlight: Chris Dodd
In this week's You Choose '08 Spotlight, Senator Chris Dodd says he's tired of the mainstream media's coverage of the election. He wants to use YouTube to "bypass the traditional media filter... to insure that the important issues get the attention they deserve."
His video asks YOU to take political action by contacting your senator to show support for the Dodd Amendment to end the Iraq war.
Senator Sam Brownback ended his week in the Spotlight in the same way he started it -- by filing video dispatches from his campaign bus. In this video response to a user question about adoption, Brownback provides great context to his answer by including his two adopted children, Jenna and Mark.
Yours,
Steve G.
YouTube News & Politics
Wednesday, June 27, 2007
Blog, Newspaper, Family. Pick any Two.
 UPDATE: Thanks, guys, for all of the congratulatory notes, words of encouragement and the contributions. I do not know whether I am more touched or psyched for the future.
 Muchas gracias, y'all.
As most of you guys know, I am also a staff photographer for The Baltimore Sun, a metro daily newspaper in the eastern US.
Over the last year-and-change, Strobist has developed from a goofy little diversion into something that is all-but-impossible to maintain along with a full-time (plus) job. My concern over the last few months has been that, while the website has certainly grown into more than I ever thought it would, my family time has been severely pinched as a result.
With a 6-year-old boy and a 9-year-old girl, (and a wife of undisclosed age) I am well aware that the window on their time as kids will be closing before I know it. So I have decided to make some changes in my life so I can spend more time being a dad. And a hubby.
As of the end of this week I will begin a one-year leave of absence from The Sun.
That was no easy decision. I absolutely love working there. But I love doing this, too. And I love my family much more than both jobs combined.
So this little experiment of a website is about to get a lot more interesting for me as I move from having one boss to having over 100,000.
Here's what that will mean:
• Most important, more family time - both in quantity and quality.
• I'll be able to travel (i.e. more seminars) without burning up my vacation time. I am working on a long list of cities right now.
• The website will be getting more thought, planning and focus.
• I'll have time to do more ambitious projects. Next month, for instance, I'll be filming a full lighting course on DVD. I hope to have it available in October.
There are a couple of other things, too. But they are still being worked on.
Assuming things work out, I will gain a tremendous amount of family time. I can't tell you how much that means to me. For that reason more than any other, I am very grateful to the community that has grown around this site and the businesses that support it.
I'll be meeting many more of you in person and getting to visit some very interesting places. And I have thoroughly enjoyed speaking with those of you that I got to meet in Ellicott City, Providence and London. I am looking forward to doing lots more of that.
So, thanks for your support and your readership. And I hope you'll stay tuned to see how this thing turns out. I know I'm curious to see what happens.
-David
Category Browsing is Back in Effect
The browse by category functionality is back up and running. Thanks again for your patience and please accept our apologies for any frustration that this temporary removal caused. We will continue closely monitoring your feedback to ensure that everything went well across the board.
Many of you also requested we put back the total number of video views, which used to display on the homepage. This statistic is now shown on your account page. You'll see the "Video Views" count in the blue rectangular box near the top of the page.
Take care,
The YouTube Team
Many of you also requested we put back the total number of video views, which used to display on the homepage. This statistic is now shown on your account page. You'll see the "Video Views" count in the blue rectangular box near the top of the page.
Take care,
The YouTube Team
Tuesday, June 26, 2007
Kingston/MPEX Team Up for Special Strobist Memory Card Pricing
This is way cool. Kingston is reaching out to photogs, eager to show that they can run with the Big Dawgs.
Midwest Photo Exchange says, "Hey, we know a lot of photographers."
They sound interested.
I says, "Yeah, and we could put a picture of me on the cards!"
(Sounds of muffled laughter in the background.)
Hey, no prob, 'cause I was, you know, obviously joking...
Long story short, you guys end up with some really good deals on compact flash (and SD) cards. Unfortunately the rebates are U.S. only, there is a limit of two per household and they have a limited amount of cards. So, early bird gets the worm. And get those U.S. citizenship applications in ASAP.
How cheap? How 'bout 8gb CF for $49.95 after rebate? (And 4gb for $23.50 AR.)
UPDATE: Yeah, I guess the prices were pretty good. You guys cleaned out the 4Gb's and 8Gb's. A resupply was expected today but has been pushed back till next week. Plenty more 4's and 8's coming then. Other sizes are still in stock.
The whole lunch special menu is here. No substitutions, and they don't use MSG.
____________________________
Hey, if you are a multinational gear manufacturer who wants to show Strobist readers some luv with special pricing, (you know - Vivitar, Nikon, Porsche...) leave your contact info in the comments. We won't publish it and we'll be in touch.
Especially if there is an "evaluation sample" 911 Turbo involved. In Atlas Grey Metallic.
Video: Two-Speedlight Bikini Shoot
Jacob the Photographer has a neat li'l video up from a bikini shoot that really gives an idea of how easy it is to effectively overpower ambient with just a couple of speedlights.
Try to reel your eyes in long enough to actually notice some of the lighting techniques going on here:
• Using high-angle key (the stand flash) with the corded, hand-held flash as fill.
• Using the corded hand-held off at an angle as a key light and the stand flash as back/separation light.
• Direct flash key (but about 2 feet higher than the lens axis) with the camera back/left separation light.
• Bringing up the foreground with flash enough to darken the sky (see here for a how-to.)
• I'll have to look into those oil-cleansing strips, too.
The main point: Look how simple and easy his various setups are, vs. what the end result look like. I mean geez, talk about minimal gear and maximum control.
That's what is it all about. Well, that and hot bikini models, of course.
My favorite part: The wolf howls from the bicycling team that rolls past at about the two-minute mark.
_________________________
Thanks for the heads-up, Jacob.
If you have shot (or found) a cool lighting-related video, please suggest it here. You can also view archived videos from the drop-down menu on the sidebar.
Sketchies - Vote Now!
Out of the thousands that entered our sketch comedy contest, only ten have made their way into Round 2. Their second video submissions are up for your viewing pleasure, but you have only TWO days left (until June 28) to decide which five will advance to Round 3. Those five finalists will then submit a new video and, starting July 6, you have the power to determine which of them will be crowned the first-ever YouTube Sketchies winner.
So watch and vote. Someone's future depends on it!
Sara P.
YouTube Film
So watch and vote. Someone's future depends on it!
Sara P.
YouTube Film
Monday, June 25, 2007
Lighting 102: Brian Daly Gets the Distance Thing.
Over the top? Maybe.
Anal retentive? Perhaps.
But reader Brian Daly now clearly understands the concept of lighting control via distance. Check out his first-day effort for the L102: 1.2 exercise.
That rocks, Brian. You own that control now.
Anal retentive? Perhaps.
But reader Brian Daly now clearly understands the concept of lighting control via distance. Check out his first-day effort for the L102: 1.2 exercise.
That rocks, Brian. You own that control now.
Lighting 102: 1.2 - Position | Distance
Summary: By the end of this discussion, you should completely understand the following two statements:
1. Light has depth of field.
2. With enough light, you can turn a white wall black.
________________________________
Leading Off: (1.1) Angle Exercise Discussion
 Okay, the 1.1 section had what was admittedly a pretty rudimentary exercise. Which maybe explains why many of you didn't uh, actually do it.
This stuff is the equivalent of "wax on, wax off" in the beginning of Karate Kid, and you really want to explore these things in an environment where you are not also trying to make a real photo at the same time.
The point of this exercise is not so much to stretch yourself, but to just go and do it. Walk before you run. Start building an easy comfort zone and then stretch it.
For those who want to check out the results, you can see the tagged and posted results here. And it is good to see that most of you are navigating the Flickr posting and tagging issues just fine.
The thing that should strike you from this exercise is just how different a three-dimensional form can look when lit from different angles. I didn't mention it at the time, but some of you made the leap to considering angles above and below the object, too. The above composite is basically a matrix of horizontal and vertical light source changes. Click the pic for a big version.
(Thanks for the extra effort, Chris!)
Experience tells me that many more of you guys will be showing up for the "real assignments," but that is the dessert. You folks who are eating your veggies and doing the supposedly boring stuff are going to be much more intuitive when the more complex stuff gets thrown at you.
I'm just saying.
_________________________________
Light Position: Distance
 My experience in learning to light (actually, in learning just about anything) is that I do not learn in a linear, sequential way. I tend to learn in fits and starts.
That is to say that I will plod my way through without making much progress, and then something clicks and I move to the next level.
Take snow skiing, for instance. When you start out, your only means of controlling your speed is by forming a wedge with your skis. It's called "snow plowing," and it ain't pretty. You form a wedge with your skis and use the friction of the inner edges to control your speed.
The first transition to real skiing is when you learn how to do a hockey stop, which is nothing more than lifting your skis up and planting them down perpendicular to the fall line with the uphill edges biting hard.
It looks so cool. And you think you are pretty hot stuff the first time you pull one off, with that awesome little spray of snow. (The sounds of screeching brakes actually played in my head.)
But what you do not realize at that moment is that the hockey stop is also the key to nearly everything that follows in intermediate skiing. It is all incremental from there. In other words, that little progression is the key to moving to the next level - and opens up many doors later on.
That is how I have come to feel about learning to understand flash distance as a lighting control variable.
So, pull out those slide rules, folks, 'cause this is where we introduce the concept of theInverse Square Law
No, no, no. Not gonna do that to you.
Geez Louise, I have an engineering background. I worry about inverted yield curves in the bond market. I build cool stereo equipment from scratch for relaxation. I would eat math flakes for breakfast if I could.
But the Inverse Square Law still makes my eyes glaze over. Not that it is necessarily so hard to understand. (Although it is for many.) But because it just sucks all of the life and soul out of lighting.
Kinda like showing up at the hotel on your honeymoon night with one of those biological/plumbing textbooks from high school to make sure you can exactly figure out the precise plan for the evening's activities. Yeah, it may be accurate. But where's the creativity? Where's the experimentation? Where's the fun?
You gotta lose the math. Here is what you need to know about the inverse square law: The closer you are to the light source, the more powerful the light. Get real close and it gets really powerful. Get far away, and it gets weaker.
And here's the other thing: The closer you get to the light source, the quicker the lighting values change as you move in. When you get farther away, small differences in distance (from the light) become meaningless.
So, let's think about this in the context of a lighting scenario. Let's say that we have a subject about 6 feet from a light grey wall. Like, say, Jason, from last week:

In this case, the light was about five feet from him, and the wall was another ~6 feet behind Jason. As we moved the light around him for the first exercise, neither the light-to-Jason or light-to-wall distance changed much. So our wall is pretty consistently medium grey.
Now take two more shots of Jason, from the same setup:

In the first, we moved the light way back. This, of course made it less powerful. But we adjusted the aperture (opened up) to compensate for that. So Jason is properly exposed.
But look at the wall: It is lighter. Why? Because the flash-to-Jason distance is about 25 feet, and the flash-to-wall distance is about 31 feet. Relatively, those two distances are not very different. So the light does not fall off much between Jason and the wall.
But for the second pic, we brought the flash in close. Like about one foot from Jason. But the wall is ~7 feet from the flash.
Relatively, that's huge difference between the flash-to-Jason distance and the flash-to-wall distance.
We close down the aperture to compensate for the brighter, closer light. So Jason is exposed correctly. But our light grey wall is now about 7 times further away from the light than is Jason. So it goes dark.
Jason is very close, where the light is powerful. The wall is at an intermediate distance, where the light is less powerful. As I move the light close to Jason - without even gobo'ing the flash to block light from the wall, I could easily make that wall go the rest of the way to black.
So, with my subject a few feet away from a light grey background, I can make the background black simply by moving my light in close to the subject.
NOTE: If little bells aren't going off in your head as to some of the doors that this light-distance variable opens up, keep knocking it around. This is a major thing.
Extra bennies? More power, (Argh, argh, argh.) Apparent size of the light source gets bigger, too. But that comes later.
So, moving in gives control and power. The light, in effect, has very shallow "depth of field," which is to say that the exposure that is correct for the close-in subject drops off very quickly behind him. Jason may be at f/11 or f/16. But just a few feet behind his head, you are already down to f/5.6 or f/4.
You gain the ability to light one plane without contaminating the other one. Sort of like selective focus, but with light. Expressed differently: Shallow lighting depth of field.
I could stick another flash on the background and light the two areas independently. That is control.
But sometimes you want a lot of depth of field to your light. Group shots, for instance. You want the front row and the back row to be in the same neighborhood, exposure-wise. Even though they may be a few feet away from each other. So you give up power in favor of even lighting.
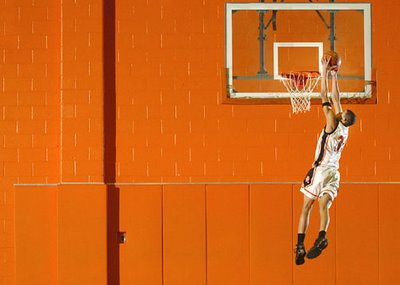
That is the secret to this side-lit (but still evenly lit) basketball gym in this shot. The speedlight (main light, camera left) is about 75 feet away in the top row of seats. It is firing at 1/2 power, and I got f/2.8 at ASA 800. But it is lighting a huge area. And pretty evenly, to boot. (More info on the shot is here.)
So, here is the first of our actual lighting control sliders, for lack of a better term:
• Light Placed Closer = more powerful, and control of the depth of the correct exposure.
• Light Placed Further = less powerful, and a broader zone of even lighting exposure.
In other words, lighting has depth of field if you know how to exploit it.
And with enough light - and adjusting the exposure to compensate for the increased power - you can drop the exposure on a nearby white wall to black.
_________________________
Trust Me, You Want to Actually Do This One
Who wants to guess this week's exercise?
It is similar to last weeks, except you will keep the lighting angle the same and vary the distance. Try to find a place with a clean background and some space to work with. I am thinking living room.
You'll be shooting a person or object in such a way as to use various lighting distances to control the relative tone of the background:
1. Find a nice lighting angle. Set the light a modest distance away - 5 or 6 feet. Shoot at max sync speed with your flash at say, at 1/8 power on manual. Adjust the aperture to get a good subject exposure with the light at the moderate distance.
2. Move the light back. Way back if you can. You may need to pump up the power to get a decent exposure. Maybe to 1/4 or 1/2 power. Adjust the aperture until the subject looks good, then note the background. It should be getting lighter.
3. Now move the light in tight. Real tight. As in one or two feet away. You'll probably have to dial your flash way down to compensate for the distance. Adjust your aperture for a good subject exposure. Note what happens to the background. It should get darker.
What you should find is that you have a surprising amount of control of the depth of field of the light. And this is before restricting or feathering the light in any way. And we will get to that later.
You should also start to be getting more intuitive about where you need to set you flash power to get a good working aperture from a given distance. Keep this up. You are growing a free flash meter in your brain.
Here are your tags for the exercise:
• strobist
• lighting102 (no spaces)
• position
• distance
You would not believe how many shooters out there have a "standard" light-to-subject distance and just give up this wonderful means of control.
Don't be one of them.
Here's a feedback request for the comments:
To the beginners - does this light distance concept make sense to you? If not, did it after you tried the exercise?
To the more experienced - are you already thinking consciously of light distance in this way? If you approach it differently, how so?
______________________
Related reading:
Light Science and Magic text, 3rd edition, pp 36-39
(Briefly talks about the inverse square law in more traditional terms. Note: It appears this book is getting to be in tight supply. I am sure Focal will be running off more copies soon, if they are not already. It is a great book. Find it wherever you can.)
On Assignments with long, low fall-off light:
Big Gym, Little Lights
Lighting a Large Interior
OA's with close-in, tightly controlled light:
Compact Fluorescent
Flavored Vodkas
See all of the completed exercises for this section.
Discuss this section in the dedicated Flickr Strobist thread.
______________________
Next: Position | Review
1. Light has depth of field.
2. With enough light, you can turn a white wall black.
________________________________
Leading Off: (1.1) Angle Exercise Discussion
Okay, the 1.1 section had what was admittedly a pretty rudimentary exercise. Which maybe explains why many of you didn't uh, actually do it. This stuff is the equivalent of "wax on, wax off" in the beginning of Karate Kid, and you really want to explore these things in an environment where you are not also trying to make a real photo at the same time.
The point of this exercise is not so much to stretch yourself, but to just go and do it. Walk before you run. Start building an easy comfort zone and then stretch it.
For those who want to check out the results, you can see the tagged and posted results here. And it is good to see that most of you are navigating the Flickr posting and tagging issues just fine.
The thing that should strike you from this exercise is just how different a three-dimensional form can look when lit from different angles. I didn't mention it at the time, but some of you made the leap to considering angles above and below the object, too. The above composite is basically a matrix of horizontal and vertical light source changes. Click the pic for a big version.
(Thanks for the extra effort, Chris!)
Experience tells me that many more of you guys will be showing up for the "real assignments," but that is the dessert. You folks who are eating your veggies and doing the supposedly boring stuff are going to be much more intuitive when the more complex stuff gets thrown at you.
I'm just saying.
_________________________________
Light Position: Distance
My experience in learning to light (actually, in learning just about anything) is that I do not learn in a linear, sequential way. I tend to learn in fits and starts.That is to say that I will plod my way through without making much progress, and then something clicks and I move to the next level.
Take snow skiing, for instance. When you start out, your only means of controlling your speed is by forming a wedge with your skis. It's called "snow plowing," and it ain't pretty. You form a wedge with your skis and use the friction of the inner edges to control your speed.
The first transition to real skiing is when you learn how to do a hockey stop, which is nothing more than lifting your skis up and planting them down perpendicular to the fall line with the uphill edges biting hard.
It looks so cool. And you think you are pretty hot stuff the first time you pull one off, with that awesome little spray of snow. (The sounds of screeching brakes actually played in my head.)
But what you do not realize at that moment is that the hockey stop is also the key to nearly everything that follows in intermediate skiing. It is all incremental from there. In other words, that little progression is the key to moving to the next level - and opens up many doors later on.
That is how I have come to feel about learning to understand flash distance as a lighting control variable.
So, pull out those slide rules, folks, 'cause this is where we introduce the concept of the
No, no, no. Not gonna do that to you.
Geez Louise, I have an engineering background. I worry about inverted yield curves in the bond market. I build cool stereo equipment from scratch for relaxation. I would eat math flakes for breakfast if I could.
But the Inverse Square Law still makes my eyes glaze over. Not that it is necessarily so hard to understand. (Although it is for many.) But because it just sucks all of the life and soul out of lighting.
Kinda like showing up at the hotel on your honeymoon night with one of those biological/plumbing textbooks from high school to make sure you can exactly figure out the precise plan for the evening's activities. Yeah, it may be accurate. But where's the creativity? Where's the experimentation? Where's the fun?
You gotta lose the math. Here is what you need to know about the inverse square law: The closer you are to the light source, the more powerful the light. Get real close and it gets really powerful. Get far away, and it gets weaker.
And here's the other thing: The closer you get to the light source, the quicker the lighting values change as you move in. When you get farther away, small differences in distance (from the light) become meaningless.
So, let's think about this in the context of a lighting scenario. Let's say that we have a subject about 6 feet from a light grey wall. Like, say, Jason, from last week:
In this case, the light was about five feet from him, and the wall was another ~6 feet behind Jason. As we moved the light around him for the first exercise, neither the light-to-Jason or light-to-wall distance changed much. So our wall is pretty consistently medium grey.
Now take two more shots of Jason, from the same setup:
In the first, we moved the light way back. This, of course made it less powerful. But we adjusted the aperture (opened up) to compensate for that. So Jason is properly exposed.
But look at the wall: It is lighter. Why? Because the flash-to-Jason distance is about 25 feet, and the flash-to-wall distance is about 31 feet. Relatively, those two distances are not very different. So the light does not fall off much between Jason and the wall.
But for the second pic, we brought the flash in close. Like about one foot from Jason. But the wall is ~7 feet from the flash.
Relatively, that's huge difference between the flash-to-Jason distance and the flash-to-wall distance.
We close down the aperture to compensate for the brighter, closer light. So Jason is exposed correctly. But our light grey wall is now about 7 times further away from the light than is Jason. So it goes dark.
Jason is very close, where the light is powerful. The wall is at an intermediate distance, where the light is less powerful. As I move the light close to Jason - without even gobo'ing the flash to block light from the wall, I could easily make that wall go the rest of the way to black.
So, with my subject a few feet away from a light grey background, I can make the background black simply by moving my light in close to the subject.
NOTE: If little bells aren't going off in your head as to some of the doors that this light-distance variable opens up, keep knocking it around. This is a major thing.
Extra bennies? More power, (Argh, argh, argh.) Apparent size of the light source gets bigger, too. But that comes later.
So, moving in gives control and power. The light, in effect, has very shallow "depth of field," which is to say that the exposure that is correct for the close-in subject drops off very quickly behind him. Jason may be at f/11 or f/16. But just a few feet behind his head, you are already down to f/5.6 or f/4.
You gain the ability to light one plane without contaminating the other one. Sort of like selective focus, but with light. Expressed differently: Shallow lighting depth of field.
I could stick another flash on the background and light the two areas independently. That is control.
But sometimes you want a lot of depth of field to your light. Group shots, for instance. You want the front row and the back row to be in the same neighborhood, exposure-wise. Even though they may be a few feet away from each other. So you give up power in favor of even lighting.

That is the secret to this side-lit (but still evenly lit) basketball gym in this shot. The speedlight (main light, camera left) is about 75 feet away in the top row of seats. It is firing at 1/2 power, and I got f/2.8 at ASA 800. But it is lighting a huge area. And pretty evenly, to boot. (More info on the shot is here.)
So, here is the first of our actual lighting control sliders, for lack of a better term:
• Light Placed Closer = more powerful, and control of the depth of the correct exposure.
• Light Placed Further = less powerful, and a broader zone of even lighting exposure.
In other words, lighting has depth of field if you know how to exploit it.
And with enough light - and adjusting the exposure to compensate for the increased power - you can drop the exposure on a nearby white wall to black.
_________________________
Trust Me, You Want to Actually Do This One
Who wants to guess this week's exercise?
It is similar to last weeks, except you will keep the lighting angle the same and vary the distance. Try to find a place with a clean background and some space to work with. I am thinking living room.
You'll be shooting a person or object in such a way as to use various lighting distances to control the relative tone of the background:
1. Find a nice lighting angle. Set the light a modest distance away - 5 or 6 feet. Shoot at max sync speed with your flash at say, at 1/8 power on manual. Adjust the aperture to get a good subject exposure with the light at the moderate distance.
2. Move the light back. Way back if you can. You may need to pump up the power to get a decent exposure. Maybe to 1/4 or 1/2 power. Adjust the aperture until the subject looks good, then note the background. It should be getting lighter.
3. Now move the light in tight. Real tight. As in one or two feet away. You'll probably have to dial your flash way down to compensate for the distance. Adjust your aperture for a good subject exposure. Note what happens to the background. It should get darker.
What you should find is that you have a surprising amount of control of the depth of field of the light. And this is before restricting or feathering the light in any way. And we will get to that later.
You should also start to be getting more intuitive about where you need to set you flash power to get a good working aperture from a given distance. Keep this up. You are growing a free flash meter in your brain.
Here are your tags for the exercise:
• strobist
• lighting102 (no spaces)
• position
• distance
You would not believe how many shooters out there have a "standard" light-to-subject distance and just give up this wonderful means of control.
Don't be one of them.
Here's a feedback request for the comments:
To the beginners - does this light distance concept make sense to you? If not, did it after you tried the exercise?
To the more experienced - are you already thinking consciously of light distance in this way? If you approach it differently, how so?
______________________
Related reading:
Light Science and Magic text, 3rd edition, pp 36-39
(Briefly talks about the inverse square law in more traditional terms. Note: It appears this book is getting to be in tight supply. I am sure Focal will be running off more copies soon, if they are not already. It is a great book. Find it wherever you can.)
On Assignments with long, low fall-off light:
Big Gym, Little Lights
Lighting a Large Interior
OA's with close-in, tightly controlled light:
Compact Fluorescent
Flavored Vodkas
See all of the completed exercises for this section.
Discuss this section in the dedicated Flickr Strobist thread.
______________________
Next: Position | Review
Saturday, June 23, 2007
Categories - We're working on a solution!
Hi everyone,
We wanted to officially address the current situation of category browsing having gone missing from the site after the latest update (which also affected search for channel honors). We want to apologize for the upset and frustration that this has caused you. We wholeheartedly understand and we have been listening to the overwhelming feedback from all of you to "bring them back!"
It was actually not our intention to take this helpful function away from you. There were technical reasons this had to happen in the short-term, but the good news is that we're working hard on a solution to bring it back. More news when we have it, and thanks so much for your patience in the meantime.
Yours,
The YouTube Team
Friday, June 22, 2007
More Cheap and Easy Grid Spots
Are you frustrated with your lighting skills?
Have your creative and/or mental blocks ever led you want to drink?
Fear not. It might be a good thing. Just keep an eye out for a special little item that can frequently be found in bars - the black drinking straw.
Why? Because when you cut them into pieces and glue them up in cardboard next to their little friends, they make great gridspots.
We have talked about making these with cardboard (free, easy, but warms up the light a lot) and coroplast (the black stuff makes fantastic grids, but is tough to find.)
But now you have an excuse to visit every bar in town. Just in case they have the little black straws.
("No, honey, it's okay. I am getting free supplies for lighting...)
 Strobist reader Rui M. Leal has started his own neato-mosquito DIY Lighting Mods blog, and shows you how to make them here in excrutiating detail.
Check out Part 2, where he shows you how to use them, too.
And if you feel shy about asking the barkeep if you can grab a handful of straws, just grace him with a little visit from your friend, George Washington to appeal to his generous human instincts.
___________________________
Related Link:
:: How to Make a Coroplast Grid ::
Have your creative and/or mental blocks ever led you want to drink?
Fear not. It might be a good thing. Just keep an eye out for a special little item that can frequently be found in bars - the black drinking straw.
Why? Because when you cut them into pieces and glue them up in cardboard next to their little friends, they make great gridspots.
We have talked about making these with cardboard (free, easy, but warms up the light a lot) and coroplast (the black stuff makes fantastic grids, but is tough to find.)
But now you have an excuse to visit every bar in town. Just in case they have the little black straws.
("No, honey, it's okay. I am getting free supplies for lighting...)
Strobist reader Rui M. Leal has started his own neato-mosquito DIY Lighting Mods blog, and shows you how to make them here in excrutiating detail.Check out Part 2, where he shows you how to use them, too.
And if you feel shy about asking the barkeep if you can grab a handful of straws, just grace him with a little visit from your friend, George Washington to appeal to his generous human instincts.
___________________________
Related Link:
:: How to Make a Coroplast Grid ::
Thursday, June 21, 2007
Four Eyed Monsters Say Thanks!
Two weeks ago, we featured a full-length film by one of our partners, Four Eyed Monsters, on the home page. We weren't sure how you would respond to a 71-minute film – or even if you'd watch something that long online - but, wow, have you shown your support.
With over 500,000 views so far, over 2,500 overwhelmingly positive comments and over 40 moving video responses, your feedback has been just as inspirational as the film itself. So much so that Arin and Susan extended the film's run on YouTube to August 15th and made a response video to your responses. We wanted to be sure that you saw the impact you've made:
Thanks for watching,
Sara P.
YouTube Film
Wednesday, June 20, 2007
On Assignment: On Vacation
 I have gone through several gear transitions in 30 years as a photographer. By that, I do not mean upgrading from an F3 to an F4, or buying a 300/2.8.
 (Actually, I remember upgrading from a Nikon F to an F2. Which makes me feel older than dirt right about now.)
Rather, I am talking about major changes in both the amount and type of gear that carry in general.
With lights, I went from Novatrons (power pack and heads) to White Lightings (monoblocs) to speedlights. With camera gear I went from carrying everything - everything - in a Domke F2 bag to shooting with one or two cameras and a small waist pack.
Basically, like many shooters, I eventually went from heavy gear and lightweight experience to the reverse. It is a natural progression. Just look at what a 25-year-old photojournalist carries vs what a 45 year-old one carries.
Sadly, the path to "less gear, more brain" usually passes through "more gear, less brain."
I travel pretty light now, with my daily bag being something with which I can do a wide range of assignments. Yet I still can travel a great distance on foot and not earn myself a bad back. No big deal. A lot of mid-career PJ's do the same thing.
But I recently have been making another transition. I have long felt that, tight as my daily bag is, I have been unable to reduce what I carry when I am off the clock. I'd basically just throw my gear into carry-on bag when I go on vacation, for instance.
I don't have a Nikon "everything" lens. And even if I did, it would still be a load on a D2Hs. And then there's light. I gotta have me some light.
 A coupla months ago, I got a Canon G7, and I have really grown to like it.
 Is it perfect? Absolutely not.
It has that point-n-shoot "baaah-dump" shutter delay. They crammed too many pixels (10 megs) into a tiny CCD chip. Which means noise, which they have to correct. So no raw. ASA-wise, you would not wanna go above 200 (too noisy.)
But, if you acknowledge it for what it is, and realize that you need to shoot differently with it, it's an amazing little camera that can make real photos. You can totally drive the train, too - manual control, actual knobs, hot shoe, manual focus and exposure, manual flash - cool stuff. Or you can put it on autopilot, or any level in between.
Shoots very nice video, killer macro, you can get an underwater housing for it, and it is just the perfect size for portability and ease of handholding.
It has image stabilization, real nice glass (equiv 35/2.8 -- 210/4.8) and a very intuitive menu system. (And remember, I am a Nikon guy.)
Long story short, I have a new vacation kit: A Canon G7, an SB-26 speedlight and a PC cord or set of Pocket Wizards. I would totally hit Europe for six weeks with this setup, a backup battery and a few 4-gig cards.
Heck, I have been shooting assignments for The Sun with it. (Don't tell them, please.) I have an OA coming soon from a features cover shot done with the G7.
I took the camera and a speedlight to Florida - no SLRs this time - and had a great time making photos. I wanted to talk about a couple of the photos from last week as sort off a "traveling light" version of an On Assignment.
Take the photo at the top of this post, for instance. We were base camping at a hotel 2 miles from Disney World to get an early start the next morning. The kids, who were way too wired to get to sleep, were getting some story time with my wife Susan. She spends so much time reading to them. And they have both become strong and enthusiastic readers as a result.
I hope one day that they realize how much of their eventual success will have been as a result of her dedication to reading books to them.
Anyway, I was busy writing a post, as usual. But as soon as I saw them, I wanted to shoot a photo.
Here's where it gets utilitarian and way cool, IMO.
With a little pocket camera and manual control (and a slave-equipped speedlight) you can quickly and easily turn this into a decently lit photo. Here's what I did.
 First things first, get the light off of the camera. I decided to use the wonderfully ironic "shoe-mount" method that was originally shown to me by a reader. (You guys rock. You truly do.)
So my light is now coming from the ceiling overhead and to camera left of Susan and the kids. I am gonna set it off with the on-camera flash, in manual and dialed way down. My speedlight, conversely, is dialed up to 1/2 power on manual, which is a lot of light.
I did this to minimize the light from the direct flash in the photo. I just want to set off my speedlight with it. The speedlight got me up to an aperture of about f/8, which I quickly dialed in using the chimp-and-adjust method on manual. Remember, I am going for speed and control.
 (Here's the shoe mount flash in detail.)
So now, my powerful speedlight, bounced from camera left off of the ceiling is determining my exposure. My built-in flash is winking just enough to set off the speedlight. And I am happily making pix.
Here's where the point 'n shoot beats my SLR. I stand on the adjacent bed, hold the camera way up by the ceiling, and chimp the TFT screen in live mode to compose (it was still at a pretty hard angle to see, but doable.) I am all but shooting straight down on them, without standing on their bed. Which would have been getting a little carried away. You have to draw the line somewhere.
("Alright, guys, she's starting a new chapter! Cue the wind and the fog machine!)
Oh, sorry.
Point is, with a tiny amount of gear and a little creativity, I have a photo that would look just as good on the wall in a frame as it will in our picture album.
________________________________

A couple of days later, we were watching our last sunset of vacation from my parents' dock when I made a shot of Susan and Em with the G7 and the (*cough, mumble*) built-in flash.
(I know, I know. But I didn't have the speedlight with me and the light was going fast.)
The point here is manual control of two planes of exposure and how to quickly get it. And before I start, I'll acknowledge that the PhD mode (push here, dummy) would have probably done just fine. And I could have probably adjusted the ambient and flash exposure by using exposure compensation.
But that still leaves the variable of maybe-the-camera-nails-every-exposure-and-maybe-it-doesn't. So I go manual, for total control and repeatability, and probably just as fast.
Here is the process. I set the camera to manual and ASA 200, and set the lens to wide open (f/2.8.) I quickly adjusted the shutter speed to slightly underexpose the sky for rich color. (The girls went to total black.) It was ~1/25 of a sec, if memory serves.
Next, I dialed my flash to 1/2 power and popped a frame. Too bright on the flash, but not by much. I only have full-stop adjustment capability on the flash, but I have third stops on the aperture and shutter in manual mode. So we adjust the flash by adjusting the aperture.
I closed down the aperture 2/3 of a stop. This corrected the flash exposure. But that darkened the sky, too. (If that comes as news to you, hit balancing flash in Lighting 101.) So I opened up the shutter 2/3 of a stop to 1/15 of a sec to compensate for the closed-down aperture.
If this sounds like a lot, it isn't. It took two frames and about ten seconds. But what I got was total control and absolute repeatability. No good expressions on errant exposures, or the reverse.
Would I have rather shot this with an SB-26 PC-corded into an umbrella? Sure. But this was just a quick-grab snapshot with a point 'n shoot on the spur of the moment.
The takeaway is that once you get comfy with this stuff, you always have your brain as part of your gear bag. Even if your "gear" is a pocket digicam with an on-board flash.
UPDATE: Got some cool ideas popping up in the comments already. Someone suggested the Gadget Infinity remotes on the Canon. Perfect combo. Why didn't I think of that? I actually have a set, which I will review when I get a couple hours time.
What is your lightweight vacation combo? Tell us in the comments.
___________________
Related links:
Canon G7 [Amazon|MPEX]
L101: Traveling Light
L101: Balancing Flash
Great Vintage Flash: Nikon SB-26
You Choose '08 Spotlight: Sam Brownback
Senator Sam Brownback rolls into the You Choose '08 Spotlight this week from his campaign bus in Iowa. Zipping past rural countryside, the Republican from Kansas talks about growing up on a farm and his "pro-life, whole-life" message.
Brownback plans to answer your questions straight from the campaign trail this week, so upload your video response and keep your eyes peeled to his YouTube channel for more videos.
Over in the Democratic race for the nomination, Senator Joe Biden released four different videos this week addressing those who responded to his Spotlight video about energy independence. Peering over a laptop and addressing users by name, Biden expounds further on an issue that he's made central to his campaign.
Don't forget that you can ask Biden and all the other Democratic candidates questions which may be broadcast and answered LIVE on CNN on July 23. Submit your videos here for the chance to be part of the first-ever user-generated presidential debate!
Yours,
Steve G.
YouTube News & Politics
Tuesday, June 19, 2007
Video: Using Reflectors for Macro Shots
Here's a short little video clip that demonstrates how easy it is to use reflectors to flesh out a macro shot.
Main point: They are lighting from the back/top, with a top/backlight-based exposure. So they use the reflectors to basically do everything else, except the additional background light.
This video is a demo for a commercial product (the reflector system.) But I think, with some deviously clever engineering, it just might actually be possible to DIY these things out of cardboard, posterboard, aluminum foil, a guy wearing a white T-shirt - whatever.
Call me ambitious, but I think it could be done.
___________________________________
If you shoot (or find) a cool lighting-related video on YouTube, please suggest it through the link at the top of the Video Archive dropdown menu on the sidebar at right.
YouTube Speaks Your Language!
Olá, Bonjour, Ciao, こんにちは, Hallo, Czesc, Hola and Hello!
Video is universal, and the incredible variety of the international content that we see on YouTube confirms just that! In the spirit of serving our communities better, we are tailoring the YouTube experience to speak your language.
Earlier today we announced local versions of YouTube in nine countries – Brazil, France, Ireland, Italy, Japan, the Netherlands, Poland, Spain and the UK. As part of this first step in our international rollout, you can now enjoy fully translated sites, with localized home pages, content and search functions. As these sites evolve, so will your localized YouTube experience, including country-specific video rankings, comments and browse pages – all while being just one click away from the worldwide view.
We're extremely excited to be offering YouTube in the languages of so many of our users, since it allows people to express themselves and unite around interesting, relevant videos. We're looking forward to seeing communities develop between people in their local communities as well as among people around the world. We can't wait to experience more original content and interesting genres of content in different languages on the site.
For those not included in this first rollout, don't despair, we have plans in the works to launch in many more countries in the near future. As usual, we'll learn from our community, and we'll adapt and innovate as you tell us to.
In the meantime, be sure to check out our new sites: br.youtube.com, fr.youtube.com, ie.youtube.com, it.youtube.com, jp.youtube.com, nl.youtube.com, pl.youtube.com, es.youtube.com and uk.youtube.com, and tell us what you think!
Yours truly,
Sakina Arsiwala
YouTube International Manager
Sunday, June 17, 2007
Lighting 102: Unit 1.1 - Position (Angle)
 Summary: Lighting angle reveals form in a three-dimensional object. To see how light from a particular angle will affect your subject, view the subject from the position of the light.
_______________________
We live in a world of off-axis light. The sun does not stay right behind us. Our lighting fixtures at home illuminate us from above and other various angles. And we are constantly exposed to imagery - both still and moving - that makes use of very sophisticated off-camera lighting techniques.
Yet so many photographers, when they take the time to compose and illuminate their photos, settle for the bland, flat, on-axis (i.e., on-camera) light. Because that is the path of least resistance.
The biggest failing of on-camera flash is that the light, which comes from a point very near to the camera's optical axis, does not have the ability to reveal the three-dimensional quality of the subject.
Granted, most flashes can be tilted to bounce the light off of walls or ceilings while still attached to the camera. But those are very limited choices out of a wide variety of lighting angles available to the off-camera lighting designer.
For the purposes of this discussion we'll think in terms of only hard, bare light from a typical electronic flash. (No worries, we'll be softening it up soon.) But the idea at this point is not to create flattering light for a subject, but to explore the way off-axis light reveals and defines an object.
The first thing that you have to consider when visualizing (or pre-visualizing) the effects of off-axis light is to remember that there are two points of view in play. The first is that of your camera, which defines what you will be able to see in the photograph. But just as important is the second, which is the point of view of your primary light source.
What your light can see will define what is lit in your photo. If your light cannot see it, it will not be directly lit.
The ability to visualize the difference between these two points of view is the key to understanding how changing your light position will alter the way your subject appears.
Look, You Already Know This Stuff.
As we start this process, it is important to begin to merge the way you think about continuous light and the way you think about flash. We have talked about this stuff before, in Lighting 101. And I really cannot overstate the importance of learning to think of strobe the same way you think of continuous light.
Why? Because you are already a seasoned pro at dealing with continuous light. You experience it and react to it all of the time. You see a shadow and instinctively know where the light came from. You know by the edges of the shadow whether the light was hard or soft.
If you can learn to think about flash as a very bright, continuous light source, you will be able to make use of all of your experience with light that you have been subconsciously building for your entire life. Thinking of a flash as a very bright continuous light source is not so easy for some people. But it will get you past the math-anxiety-type fears you may have about learning how to light.
Heck, even a little mouse munching on lunch in a field knows it had better haul butt when it is suddenly darkened by a shadow. It very well could be an approaching hawk. And the mouse likely knows which way to run when the shadow appears if it has a situational awareness of the lighting environment it is in.
Here is simple exercise that will improve your light visualization skills. Stand in front of a mirror, holding a (lit) table lamp in one hand. Move the light around so that it falls on your face from a series of angles and observe the results.
Yeah, you might feel (and look) a little goofy doing this. Oh, and you might want to have a good response ready for when your significant other pops in and gives you one off those "What the...?" looks, too. But I can vouch for the fact that it works very efficiently to train your eye to light.
Reverse Engineer Photos to Sharpen Your Perception of Light
Let's see what we can tell about the light in this photo just from studying the shadow:
1. Well, right off of the bat we know that the light is coming from camera right, because the shadow goes to camera left. (Don't get cocky. The mouse could have figured that out.)
2. We know the light is hard because the shadow edge is hard. (We're not there yet, but you know that info all the same.)
3. We know the light is slightly higher than the subject because the shadow goes slightly down.
4. We know the light is fairly close to side light (i.e., close to the wall) because of the length of the shadow.
(Note that there is a very dim secondary shadow at camera right. This is coming from the ambient light, which is not totally overpowered.)
It's just a dumb, quick little exercise. But the more you make it a habit to look at photos with an eye toward analyzing the light, the easier it becomes to create any effect you are looking for with your own light.
Here's a little home experiment to try without even making a photo. Position a household lamp so that it illuminates an object. Look at the object from the position of the lamp. See what the lamp sees. Now move away from the lamp and study the changes in your subject as the lamp reveals the object in relief while you move your point of reference further away from the axis of the light source.
Compare the lit portion of the object (as you move away from the lamp) with what you were able to see of the object from the position of the lamp. That's the first step to pre-visualizing light.
Do this kind of exercise enough, and you'll be able to know exactly how a subject will look when lit from any direction before you ever position your light. Better yet, when you pre-visualize a photo you'll know at what angle to position your light to get the effect that you want.
There are actually two variables to consider when deciding where to position a light. The first is at what angle to light your object. The second is at what distance to light your subject. Each variable offers a different form of control for a photographer to exploit.
Let's Try it with Some Live Ammo
For the first little shooting exercise, we'll be dealing only with angular position of the light. This experiment is going to be so simple that many of you will not even want to do it. But I really hope that you do.
Take a person or object (in my case, Combat Camera photog Jason Robertson, from the DINFOS workshop earlier this month) and shoot it/him/her with the light very near the camera axis. You can even stick the flash directly fired on camera for the first shot. You should have a wall behind the subject (with a few feet of separation between the two) as a reference for any shadows.
As for exposure, try this method as a way to start to learn to light without a flash meter. Shoot in a normally lit, indoor room. Set your ASA on 200 and your camera at your normal max synch speed. For most of you, this will be somewhere between 1/125th and 1/500th. Set your aperture on f/5.6.
Start with your flash on manual at, say, 1/16th power, about five feet away from your subject. (If you keep the flash-to-subject distance the same as you change the angle, your exposure will not change.)
Now do a test shot. You subject will likely be a little too light or too dark. Adjust the aperture on your lens until the exposure looks right. If this seems clunky, understand that working this way will soon turn your brain into a built-in flash meter. With a little experience, your first tries will get closer and closer and exposure adjustments will be more and more minor.
Back to the exercise.
After adjusting for a good exposure for your on-camera light, move the flash around the subject and shoot it from a variety of lighting angles. For the example above, I just put up a straight-on and a 45-degree lit shot. But you'll want to play with it more than that. Experiment with some hard angles, in addition to the normal stuff. Look at the different ways in which your light reveals the subject. Again, keeping the distance constant will help keep your exposure constant, too.
Try a shot with the light at about 45 degrees to one side. Have your subject look directly into the camera. (Or have your inanimate object continue to be inanimate.) Now, keeping the subject looking in the same direction, walk over to your light and shoot the subject from the perspective of the light.
Compare the two photos, noting what you see from the position of the light with what portion of the subject was lit in the straight-on photo when the light was hitting it at a 45-degree angle. This may seem like rote, boring stuff. But the goal is to learn to light in a more intuitive manner. And observing your subject from the position of your light source is a great first step in that direction.
There is no need to stick these in the Strobist Flickr pool, but you are welcome to do so if you want. The important thing is to start actually doing this stuff and to learn to use the tagging process. Then we can easily tag, group and view the more challenging assignments later.
When uploading this exercise to Flickr, your photos should have the following tags:
• strobist
• lighting102 (note that there are no embedded spaces)
• position
• angle
If you do that, everyone will be able to easily find them with by clicking here. We'll be talking about this exercise next Monday (June 25th) and moving on to discussion of Unit 1.2 - Position (Distance).
____________________________
Questions, answers, etc: Please use the discussion-specific Flickr thread for further discussion.
Related Archive Pages:
L101 See the Flash
L101 Be the Flash
Hard Light
L101 Reverse Engineering Light
Bloggers/Vloggers: If you are blogging your exercises/assignments online, or posting videos about the process, you can include your efforts in the Technorati Trackbacks by linking to the permalink of this post.
NEXT: Lighting 102, 1.2 - Position | Distance
You Choose '08 Spotlight: Barack Obama
Senator Barack Obama charged into the You Choose '08 Spotlight this week by asking how you can help restore a sense that "politics matters." In his Spotlight video, he asks you to share your stories on the work that you are doing at the neighborhood level to make the country better.
Obama's campaign plans to stitch your video stories together to demonstrate what the next generation is doing in public service. At 45, Obama is the youngest of the Democratic candidates on the You Choose '08 platform. He's served in the Senate since 2004, when he became the third African-American senator since Reconstruction.
Yours,
Steve G.
YouTube News & Politics
Friday, June 15, 2007
DIY Engineer Lamp Macro Light Stand
 Frankly, given this photo, words aren't really necessary. But I guess I have to write something or it is not a real post.
In that case: "Blah, blah, blah. Yadda, yadda, yadda..."
(
Basics, on Video: Connect Any Speedlight to Any Camera
Just in time for the first lighting control discussions (#1, "Position," which is due up Monday) Strobist reader David James has put up a very helpful video tutorial for those of you still hazy on exactly how to sync a camera and a remote flash.
It covers both flashes and cameras with and without PC jacks, hitting on both PC cords and the inexpensive Gadget Infinity remotes.
This will be very helpful to many of the newer readers. It's also helpful to me, as a post while I am recovering from a long day at Disney World and still trying to squeeze as much R&R as possible out of my last couple of days down at my folks' place in Florida.
The last few days have been wonderful. But I don't even want to think about how big my unanswered email pile has gotten...
(Thanks, David J.)
Site Update
Greetings 'Tubers! Our engineers and product people have been very busy optimizing your experience here to be more intuitive, user-friendly, and more "breatheable" overall. Check out what they've been up to:
SEARCH LAYOUT MAKEOVER
We've made searching for videos even easier! The search page now lets you choose how you want to display your results (just click on the "List View" and "Grid View" icons to the right of the "Sort By" options). Those sort links now also appear above the search results and the search bar has been moved to the center of the page.
HOMEPAGE ADDITIONS
Now you can see thumbnails of videos your fellow users are watching in real-time. In addition, the user message center now displays alert notifications for friend requests, new messages, video responses, and videos received to your account.
WATCH 3.0
We've beta released a new version of our watch page! Major changes include: increased video player size, more videos from that user's channel are more easily accessible, and related videos are more prominently displayed. We also simplified the actions appearing underneath the video player and redesigned QuickLists. To check out the new watch page, just click on the 'try our new version' link showing to the right of the video you're watching. Your feedback is always important to us, so don't be shy and do let us know how you really feel about the new watch page. Please send any comments, suggestions or rants to: watchfeedback@youtube.com.
UPLOAD REDESIGN + GEOTAGGING
The upload page has a completely new look and now also includes a super cool Google maplet, which allows you to indicate the exact location of where your video was taken (just click the "Date and Map Options"). You can also choose Sharing Options for comments, video responses, ratings and embedding during the actual upload process. Quick Capture and Upload have also been streamlined to share the same step 1 and confirmation pages.
ADOBE REMIXER
Have you been wishing for an easy way to edit your videos without buying extra software or bugging your video-savvy friends to do it for you? The long awaited Adobe Remixer is finally live! Remixer allows you to edit your videos with text, audio, graphics, overlays, effects, and transitions…right here on YouTube (no fancy equipment required). Check out the new YouTube Remixer, available on TestTube, and you'll be an expert in no time.
Toodle-oo,
The YouTube Team
Thursday, June 14, 2007
Announcing the CNN/YouTube Debates
What do YOU want to ask the presidential candidates? For the past few months, you've had the opportunity to connect with the candidates on our You Choose '08 platform. Today we're announcing two exciting events that will bring that dialogue to national television: two presidential primary debates on CNN in which you ask the candidates questions through YouTube.
First up is the Democratic debate, which will be on July 23. Start submitting your questions today at www.youtube.com/debates.
So what makes a good question? Make sure to read the guidelines on the debate page; CNN will choose questions that are personal, short, and relevant. When possible, make sure to give context to your question – the power of video is that you can show us where you're coming from instead of just telling us.
Want some inspiration before you get started? Check out these sample questions, and then get out your camera and start rolling!
And stay tuned - you'll get to face the Republican candidates this fall during the second CNN/YouTube debate, on September 17 in Florida.
Yours,
Steve of Citizentube
YouTube News & Politics
Wednesday, June 13, 2007
On Assignment: Parking Lot Ambush
 This photo, which was previously posted on Monday and shot during the DINFOS Advanced Lighting Team workshop last Friday, got a lot of interest up on the Flickr comment threads. So I thought I would do a little tutorial on exactly how it was done.
If you are looking for a setup shot, you already have it. The photo is the setup shot. We used everyone's flash, synchronized to produce a photo that looks random but was in fact very choreographed.
We used six flashes for the shot - 3 SB-26's and 3-SB-800s. They were mounted on voice-activate light stands, also known as photographers. There are several tricks to pulling this off. But once you have a roadmap, it is quite easy.
First, you have to make the flashes think they are not connected to the cameras. We did that by sliding pieces of paper between the flash and the hot shoe. (After that point the shooters are essentially light stands.)
Second, you have to sync the flashes together and to the main shooter's camera. We did that by using Pocket Wizards on the SB-800's and using those in turn to fire the SB-26's in slave mode. You could do it with fewer flashes -- even one could look cool. But we had six at our disposal. So what the heck, baby.
Third, you have to position the flashes to create the light you want. It appears fairly random. But if you look carefully, we have two back lights, two side lights, a front camera left main light (coming from up high - the "Hail Mary" camera, for a good lighting angle) and a front camera right fill. Kinda hard to miss, come to think of it.
My camera, ironically, had no flash on it -- only a Pocket Wizard. IMO, the total effect almost looks a little Jill Greenberg-ish, but without the soft lights or ring flash.
The exposure was based on the sky. I wanted to underexpose it a couple of stops. So we shot with a D70s (using the electronic shutter sync hack) at 1/1500th at f/8 at ASA 200, if I remember correctly.
The flashes, in close and zoomed to 85mm, were set on 1/8 or 1/16th, depending on their distance to the subject. So recycle time was not an issue. I could have pretty much motored away.
Always remember: Short distance = power and speed.
 I had never tried this technique before, and our only prep was a couple of shots up in the hotel room. We like to be thorough, so we put in a good minute or so of research and testing.
 Really, this was just a run-and-gun thing, with very little prep time and not much shooting time, either. It was shot at 1:00pm on a 96-degree day in really crappy light. We had much to do, and we were getting hungry.
 Once we were downstairs in the parking lot, I popped a couple of frames to make sure that all of the lights would synch. They did -- every time. No worries, mate.
Also, I wanted to make sure that the flashes would all sync at the high shutter speed. As you can see, we were batting 1.000, even though we were working way above the ambient light.
I have to say that I absolutely love this new (for me) technique. And I would probably use the crap out of it, given the opportunity. But since I do not have six shooters following me around every day, it won't end up happening very often.
That said, I will probably be experimenting with overpowering daylight with a bunch of hard lights wrapped around the subject more often, too.
Here is what struck me from the process.
• It was far easier to choreograph (and pull off on a technical basis) than I expected. If you try it, be sure to stick your results up in the Flickr pool.
• In the end, it was darn-near impossible to get a bad looking shot. They were almost all keepers. Which actually sucked at 2:00am when we were editing this stuff. It was not easy to narrow the pix down.
But as problems go, I'll take that one every time.
As you read this, the missus and I will be at Walt Disney World with a 6- and an 8-year-old in tow.
Lord, give us strength. And please send that 3:00pm thunderstorm to thin out the amateurs in the crowd.
Tuesday, June 12, 2007
Pocket Wizard Tutorial Video
Honestly, I cannot imagine any other website that would see a dry tutorial on Pocket Wizards and think, "Cool!"
I'm such a flash geek.
Are you lusting after a set of PW's? Or do you already have them and want to learn how to use the relay mode? Either way, this clip ought to hook you up just fine.
Do you have a lighting-related video to suggest? I'm all ears. Here's how to let us know about it.
Or if you want, you watch other archived videos by clicking on the "Video Archive" dropdown on the sidebar.
Monday, June 11, 2007
L102: You Got Questions, We Got Answers
 Thanks for the questions, guys. It is the most efficient way I know to hit all of the things I forgot to explain in the first place. Let's get them out of the way so we can get this L102 party started.
Regarding the suggestions as to (a) where to get the gels, and (b) the admonitions to actually buy them so as to not mooch off of the company, I totally agree. You should pony up for a full sheet of CTO and a sheet of window green. These are the tungsten and fluorescent conversion gels. You will use these A LOT. But, for speedlights, it is hard to justify buying many more. So just ask for a sample pack at every opportunity, and you should be well-covered.
What I'd like to see: A sample pack that had 10 each of CTO and Window Green, 5 each of CTB, 1/2 CTB, 1/4 CTB, 1/2 CTO, 1/4 CTO, 1-stop ND, and a coupla reds for $15 each. Slightly bigger than the current sample packs would be great. They'd make money and we'd be gellin' in style.
There was a suggestion that people shoot their setups on the photo uploads for the assignments. I totally agree with that, if you can remember to do it. Not being without sin in this area, I cannot really insist on it...
Q: Will I be picking example reader submissions to talk about after the fact?
A: Sure will. Probably three or so from each exercise/assignment.
Q: Could you add a Lighting 102 link to the top right side menu of the Strobist homepage?
A: Yep. It'll be up as of the first lighting control post, which will be next in the series.
Q: Should I do Lighting 101 first?
A: That will always be a good reference/foundation. But L102 will be a far more comprehensive approach. I will be referencing relevant posts in L101 as we go along.
Q: How often do new posts (lessons) go up for it? Once a week?
A: That will roughly be the schedule. We'll need time for stuff to sink in, for people to see the latest post, and for exercises to be done. And also, for me to create the posts/exercises while also running the rest of the blog, shooting for The Sun and occasionally sleeping. The exercises will be quick hits, completed from week to week. But the assignments will be more involved. You'll have a minimum of two weeks to complete each assignment. I'll get into a rhythm of posting L102's on or near Mondays. But because of the vagaries of my job at The Sun, that is more of a goal than a promise. (Could be Sunday or Tuesday, for instance.)
Q: I only see one thread for the Lighting 102 discussions. Will there be separate threads for each section?
A: Oh, yeah. Can you imagine all of the L102 discussion compressed into one thread? Yikes. I will be setting up a separate thread for each discussion, exercise and assignment.
Q: (I am) attempting to participate without a hot shoe or any means (that I know of...if there are ways to manually control off-camera flash without hooking it up to my camera directly, please let a newbie know) of off-camera flash....ergo, lamps. Well the principles will still be the same?
A: Uh, yeah... somewhat. But you'll miss out on a lot. If you were learning how to SCUBA dive, you'd want a mask...
Q: I have a new monolight kit (200ws each so small) that I want to get comfortable using, so I think I'll try the sam exercises with them as well.
A: That should work just fine.
Q:I would like to create videos of the exercises/assignments and post them on YouTube. Is this okay?
A: It is more than okay. I think it is a great idea. We are visual animals. Monkey see, monkey do. I will be happy to link to the good ones and archive them so that others may benefit from your efforts. FWIW, the YouTube videos that are linked here tend to get about 10,000 views over the first couple of weeks. Which always helps if you are looking for exposures. And if you are really good, I have a script I'd like to share with you...
Q: I would like to blog about my progress in Lighting 102. Is this cool?
A: Absolutely not! (Kidding.) Of course it's cool. In fact, I would encourage it.
In a broader sense, I think anyone who is into photography should be blogging. It's free, creative, visual - all those things shooters like. Couldn't be easier, really. Heck, I helped my dad start up a blog this afternoon, and he's 62.
I recommend Google's blogging platform, blogger.com. It may not be the spiffiest platform out there, but it is pretty darn good and getting better each day. Besides, with Google owning it, it'll probably be around in five years.
A year ago, I started a blogspot blog just to fart around with lighting ideas and look what has happened. You really never know. And I have never paid a penny for bandwidth, or anything associated with this site. Way cool.
Besides, blogging steadily about this process will mean you'll be more likely to stick to it. Kinda like telling your coworkers you are starting the Atkins Diet. For the 6th time this year.
Next: Control #1, Position | Angle
Sunday, June 10, 2007
DINFOS Rocks.

Man, am I whupped. I just got back from teaching the back half of a week-long intensive lighting seminar at the Defense Information School (DINFOS) at Fort Meade in Maryland.
Here's the deal. Photographers are chosen by portfolio from among the U.S. military shooters all over the world. They are sent to a one-week workshop, courtesy Uncle Sam, at DINFOS where they fan out and shoot assignments of just about every nature.
They are learning and competing - a great combo. The cool prizes (Nikon cameras, strobes, Lowepro bags, etc.,) are second only to the bragging rights for the winners. It's almost worth heading down to the army recruiter to sign up, just for a chance to get in.
Almost.
In addition to the photojournalism groups, there is one group of five shooters chosen to be on the Advanced Lighting Team. That lucky group is normally taught by none other than Joe McNally for a whole week, where he works with them in an intensive, small-class environment.
Well, Joe M. couldn't make it this year, so the duty was split between myself and a former Patuxent Publishing coworker of mine, Joe Eddins of the Washington Times. He got them first and then handed them over to me. Joe had them for Mon-Weds, then I got them for Thursday and Friday. The presentations and dinner were on Saturday.
My guys had been out
When Friday arrived, we were
 So we turned in a 17-hour day on Friday. We started shooting at 10:00am, finished at 9:30pm and then edited and produced the QuickTime show until 3:00am. These guys totally rocked, and I could not be more proud of them.
I'll be putting a YouTube version up in a few days. But I have to swap the music out first.
Suffice to say that when you are choosing music for a next-day show at 2:00am the night before, copyright and DRM are just fleeting little theoretical thoughts that are not on your top ten list of worries...
 Matt H., Matt L., Andy, Jason and Sean, if you are reading this, there will also be some "On Assignments" popping up over the next few weeks featuring your photos and the techniques behind them.
And you mere civilians will definitely want to check out their stuff as it pops up. We did six shoots in a day and they all yielded strong photos. Lots of setup shots, too.
Sorry if I have seemed a little nonexistent on the website this week.
I am sitting at the BWI Airport waiting to catch a plane to Florida for a week, where I'll be looking to get my first good night's sleep in quite a while and then hit the Q&A post for Lighting 102. The first real classwork will be up shortly after that.
We'll then settle into a (roughly) weekly schedule for the L102 tutorials, discussions and assignments after that.
Oh, and on behalf of my Advanced Lighting Team (The "Serial Flashers") at the DINFOS photo workshops, I would like to offer our sincere thanks (to those of you who are U.S. taxpayers) for picking up the tab.
Aye YouTube on iGoogle
Interested in being able to watch YouTube videos from your iGoogle homepage? How about the ability to search YouTube from this very same gadget? If you don't yet have an iGoogle homepage it's easy to get started. Our friends at Google have this nifty thing called iGoogle, which essentially lets you personalize your home page with all kinds of gadgets, RSS feeds, search boxes, and more. You can even change the look with different themes. Get started today and install the new YouTube iGoogle Gadget!
Cheers,
Igor
YouTube Engineer
Cheers,
Igor
YouTube Engineer
Saturday, June 9, 2007
Update on New Embedded Player
Thanks for all the feedback - please keep posting your constructive comments here, as this is a huge help for us in gauging community needs. The designers are continuing to evolve the embedded player to address some of the concerns raised here while still providing new ways for people to discover videos. You may have already noticed the following changes: related videos only show when the menu button is pressed, mouseover function is no more, and the menu for related videos now displays at the end of the video you've just watched.
You'll see more changes coming up which will allow deeper customization of the embedded player -- whether you want the "classic" single video playback or some great new ways to display a variety of videos on your website, profile page or blog. Bottom line: we want this new feature on embeds to work for you.
If you'd like to turn off the option to see related videos through your embedded player, simply add "&rel=0" after the video ID number in the embed code. Here's an example of what your embed code should look like if you'd like to turn off this feature:
<object width="425" height="350"><param name="movie"
value="http://www.youtube.com/v/xxxxxx&rel=0"
></param><param name="wmode"
value="transparent"></param><embed src="
http://www.youtube.com/v/xxxxxx&rel=0"
type="application/x-shockwave-flash" wmode="transparent" width="425"
height="350"></embed></object>
Cheers,
YouTube Team
Friday, June 8, 2007
Presenting Four Eyed Monsters
When artists Arin Crumley and Susan Buice first met, they agreed they would only communicate through visuals. What followed were scribbled notes, drawings, vlogs, etc., that chronicled the start of their relationship and would eventually become their first feature film, Four Eyed Monsters.
The film was accepted to festivals, won awards and was praised by critics. That could have been the end of the road, but Crumley and Buice did something unique: they created podcasts about the making of the film and their struggle to get it released. The videos went on to garner over 1 million views and built such a large and loyal online audience that they were able to self-distribute their film to six major markets.
Crumley and Buice are a great example of a new era of artists using the Internet to take the distribution of their work into their own hands. And as you can see from fan interviews, the two aren't interested in using new technologies only for themselves – they want to see all artists empowered.
Now, as YouTube partners, Four Eyed Monsters are able to share their full-length, forward-thinking creative vision with you. Check it out.
Yours,
Sara
YouTube Film/The Storyboard
Thursday, June 7, 2007
Stellar by Starlight
Here's your scenario: You are assigned to shoot a wedding on a beach. Brief ceremony - about 10 minutes long.
Oh, and did we mention it's at night? With no lights at all? And when we say 'no light' we mean that the bright part of the night sky reads (at ASA 400) f/2.8 at twenty seconds.
The goal: General coverage of the event and one stunning photo.
Matt Adcock gives us the rundown on how a couple of fellow Atlanta wedding photogs handled thisnightmare assignment over at FlashFlavor.com.
Oh, and did we mention it's at night? With no lights at all? And when we say 'no light' we mean that the bright part of the night sky reads (at ASA 400) f/2.8 at twenty seconds.
The goal: General coverage of the event and one stunning photo.
Matt Adcock gives us the rundown on how a couple of fellow Atlanta wedding photogs handled this
You Choose '08 Spotlight: Tom Tancredo
Currently reaching out to voters in the You Choose '08 Spotlight is Tom Tancredo, the Colorado Congressman who's nationally known for his tough stance on illegal immigration. Tancredo's Spotlight video asks you to weigh in on the immigration issue by telling your personal stories about how illegal immigration has affected you.
Governor Mike Huckabee got back to the YouTube community last week with this reply video to his question, "Do you want to see the IRS disappear?" Click below to hear Huckabee talk more about his plan to institute the Fair Tax.
The Spotlight is your chance to speak directly to the candidates about the issues you care most about. We'll be announcing a similar opportunity very soon, when we release the details of two live presidential debates that YouTube is producing with CNN.
Keep your eyes and ears peeled,
Steve of Citizentube
YouTube News & Politics
Wednesday, June 6, 2007
L102: Light Controls Overview
Today, we'll run through the various lighting controls to give you some context for later. If these are all old hat, you may be in for more than you think. While they may sound simple to some of the more seasoned readers, I am discovering new techniques all of the time simply by studying these controls on a one-by-one basis. And I expect to learn a lot just by going through this process myself.
Each control has a range of possibilities, and offers both advantages and disadvantages that can be exploited or avoided for a given subject.
Lighting Controls Overview
1. Varying the Position
Changing the angle of your light position is what will allow your flash to define the three-dimensional shape of your subject. This is where on-camera flash fails us. It illuminates, but does not reveal shape. Getting your light off of the camera is the most basic control, so it is our first of the seven.
In addition to varying the angle of your light source, you can also dramatically change the effect of your light by varying the distance to the subject. In particular, altering the distance of the light to the subject as it relates to the distance from the light to the background.
2. Varying the Apparent Size of the Light Source
Note that I said "apparent." In photography, size does not matter. Apparent size matters. How a subject sees your light source will determine many things.
Size of light source can be altered by reflection off of a diffuse surface, or transmission through a translucent material. In addition to changing the apparent size of the light source, this will lower the intensity per square inch. This, in turn, will alter the way your light interacts with your subject.
We also will spend some time in this section talking about how the various surface properties of your subject come into play with your light source, and how to exploit those variables.
3. Altering the Relative Intensity
This is about balancing light - with the ambient, other strobes, lightning, glowing swamp gases, whatever.
It is not about the light level. That is easily compensated for by your exposure settings. The magic is in the relative light levels, and where you place your exposure settings with respect to your various light intensities.
This is a sticking point for a lot of people, so we are gonna hit it hard.
4. Restricting Light
Even more important than where your light goes is where it does not go. We'll be using various light restricting tools and exploring their effects in a methodical way.
Snoots, grids, gobos, cookies, (man-made and natural, oatmeal and chocolate chip) beam-width adjustment, feathering - it's all good. And we'll be hitting each one in turn.
5. Refraction and Reflection
You do it without thinking about it every time you zoom your flash. That little fresnel lens in the front bends your light to suit your mood. Or at least your lens. But there are other ways to bend light, and we will be exploring them.
Water, glass, mirrors, the extreme gravity around a black hole - whatever it takes.
6. Altering the Color
We're talking gels, gels, gels and more gels. Sure, white light is clean and predictable, but you have a whole color spectrum to play with. We'll make sure we get the basic color correction stuff in. But we'll also be looking at altering light color to develop a theme in a photo.
There are subtle things you can do, and not-so-subtle things. Most people are about as subtle as a ball-peen hammer when they start out with gels. But, just as the vinophiles will tell you, the real fun is in the slight variations.
Layering colors from a given family, complimentary color cross lighting, deliberate in-camera color balance shifting and more.
If you do not have a Rosco or Lee sample pack, beg borrow or steal one. And if you have a good source for said sample packs, please sound off in the comments. Especially out-of-US sources. I never, ever turn down a sample pack. Ever.
Go ahead. Offer me one and try me.
7. Time
Flash is impossibly brief, but continuous light is variable with respect to time duration. This gives us another creative lever to exploit.
Yes, light is light. But elapsed time adds a fourth dimension to a three-dimensional world, and offers results that simply cannot happen in a single instant.
_________________________________________
So, there you go. Seven straightforward concepts that together yield a world of possibilities.
We will explore them, dissect them, discuss them, occasionally curse them and finally get to know them on an instinctive level.
That accomplished, the goal will be to control them without letting them distract us from more creative thoughts.
When you tie your shoes, you do not consume mindshare by remembering that the little bunny has to go around both trees before it hops into its hole. (Can you tell I have kids?) You just tie your shoes while you are thinking about more important things. That's how you want to be when you position your lights, for example.
I have noticed a lot of questions popping up in the comments and the L102 thread on Flickr. So before we dive into "position," I will answer as many questions as is practical in the next L102 post, to minimize confusion going forward.
If you have a question, try to stick it in the L102 thread in the next few days. I'll go through and answer as many as I can, assuming they have not been answered by someone else.
FYI, I am teaching for the rest of the week at the Defense Information School at Ft. Meade in Maryland. It is put on by the US Department of Defense and Nikon. I have three days with a hand-picked class of six military photographers to teach an intensive course on location lighting. With such a luxurious amount off time and such a small class, I am chomping at the bit to get started.
That's right folks, join the Army and learn to light. ("Just sign on the dotted line, son, and those SB-800's are yours...")
Following that, I am headed down south with my family for a week to see my folks in greater metropolitan Umatilla, Florida. But I have some interesting stuff in the hopper all ready to go during my so-called vacation.
And two more big announcements when I get back.
Next: L102: Questions and Answers
Subscribe to:
Posts (Atom)