We mentioned the upcoming limited release of a New Experimental Personalized Homepage on our blog a few days ago. As of today, the page is now available to a small, randomly selected group of users. But even if you're not in this group, you can still give it a whirl. You only need to login to your YouTube account and click this link to opt in to the experiment.
We want to know what you think about this new personalized YouTube experience. The more feedback we receive the better, so don't forget to leave your comments here. We'll be watching!
The YouTube Team
Friday, February 29, 2008
Thursday, February 28, 2008
Top Our Group Shot: German Edition
 UPDATE: See the very cool improvised camera boom they rigged for the shot.
Frequent contributor Bert Stephani, who blogs at Confessions of a Photographer recently popped over to Frankfurt to lead a little lighting meetup.
Bert, who is recovering from getting his camera bag stolen in Spain, decided to riff a little on the meetup group shot theme. For this shot, they used no fewer than twenty flashes, all synched by BioWizards.
BioWizards?
Hit Bert's post for more info.
And FWIW, I have been planning a little local group shot of my own. If you are local to DC, I'll be trolling for volunteers soon (not yet). Hey, somebody's gotta knock Bert off.
UPDATE: Here is a video from the meetup:
_____________
Speaking of meetups, some pretty cool videos have been coming in lately from the various get-togethers. I have posted link to search for them on YouTube. Just make sure your title, tags or description contains the words "strobist" and "meetup" and you should show up in the results.
-30-
LumiHarold? LumiBob?
Betcha didn't know that LumiQuest (makers the folding light modifiers since way back in the day) was named after its founder, Quest C. Couch. In fact, Quest has been answering lighting questions from readers for over a decade. My kinda guy.
I've mentioned their fold-flat UltraBounce before. And I am also a fan of their LQ-104 "Big Bounce," which can ape a small soft box in close and is a fave of run-and-gun event shooters.
Please join me in welcoming LumiQuest as a sponsor. Midwest Photo Exchange has even whipped up a sale (up to 25% off) to welcome them aboard.
:: LumiQuest Welcome Page ::
:: MPEX Sale Page ::
:: "Ask Quest" ::
-30-
"Moment it Clicks" Back in Stock Again
For those of you who missed out on the first printing, Joe McNally's book, "The Moment it Clicks," is now back in stock at Amazon. (The first run was gone in just a few days.)
In the meantime, Joe has posted a video on YouTube from the making of a shot featured in the book: Changing the light bulb atop the Empire State Building.
FWIW, I can barely even watch this thing. I do not like heights. Dude is crazy, IMO.
:: Moment it Clicks: Full Review ::
-30-
Super Delegates 101
If you've been following the race for the Democratic presidential nomination, you've probably heard a lot of talk about super delegates. But what exactly are they? And just how might they affect who gets the Democratic nomination? Listen to Ari Berman explain on The Nation's YouTube channel:
YouTubers are weighing in on the validity of super delegates and how they should vote. In this video, ADamnProudAmerican gives a stern warning to the Democratic Party that if super delegates decide the outcome of the convention, a lot of swing voters won't be happy — himself included. In this video, JoeFelice has one simple message: "Don't sweat the super delegates." He reminds voters in upcoming primaries and caucuses that they — and not the super delegates — will ultimately decide who becomes the Democratic presidential nominee.
What do you think? Upload your thoughts to YouTube and let the world know your thoughts on the Democratic nomination.
Yours,
Steve G.
YouTube News & Politics
Wednesday, February 27, 2008
Who'da Thunkit Backdrop: Roofing Panels
Photographers Joe Daylor and Joe Stern can get that industrial look any time they want, after creating a sectional background from inexpensive plastic roofing panels and some spray paint.
Honestly, without good light, this stuff would probably look pretty goofy. But the 3-d quality of this stuff makes it fairly versatile as a backdrop, depending on how it is lit. And if you can control both your light and your background in any location, you are pretty much good to go.
Thanks for the idea, guys. When I think Home Depot backdrops, I almost never make it past the paint aisle. Learn something new every day.
:: Suntuf Panels ::
-30-
Jamie Squire, on That Killer Daytona 500 Shot
Remember the amazing USA Today sports front from the the Daytona 500 we blogged last week? Hit the jump to read about exactly how Jamie Squire (along with Matthew Stockman) conceived and shot it.
____________
There was confusion in the comments on both the technical stuff, and on the seemingly similar photos made by fellow Getty shooter Matthew Stockman. This kind of thing happens way more than you'd imagine when teams of shooters cover big events.
But it is important to understand that what is important is producing the best overall coverage possible as a team, without hot-dogging and shot duplication.
Jamie Squire: How It Was Done
I was on the flagstand for the race and for the finish. Matthew Stockman and I set up the remote before the race. I chose the location. I climbed up the 20-ft ladder and positioned the camera. I came up with the exposure.
It was shot with at Shutter priority -1 stop. (1/30th to be exact.) The camera data shows the aperture at f9. The star effect was a happy accident.
 It worked as planned: I deliberately set the slow shutter speed to catch the strobes and underexposed as I knew the flashes might make the subject too hot. The sheer number of strobes that were caught was luck.
There were several other frames that looked nice as well with various strobe patterns, but this was the best with the circular shape of the Gatorade.
The only part that didn't go as planned was that Newman was supposed to turn back toward his crew. I guess he forgot! And, a few of the guys ran off with all the Pocket Wizards I provided! Ha!
Matthew fired the camera from victory lane -- and it was his camera.
It was purely a collaborative effort. When this happens, there is always the controversy over whose shot it is.
One way to solve this is to list joint credit. The images from this camera could have been credited Jamie Squire/Matthew
Stockman. Matt and I have worked together for years. Every year we do the Kentucky Derby and set several cameras in the dirt. Then we divide up the cameras and whichever shots come out of those cameras is how we credit those photos, even though we did the work together for all the cameras.
In this case, there were several usable images. We each chose a couple we liked and put our names on those. So, the similar images on the Getty site did come from the same camera, but are credited differently.
My shot ran in USA Today. Matt's ran in NY Times. Either way, we were both pleased with the outcome.
Maybe that will satisfy everyone's curiosity. I don't think the debate over the credit should diminish the amount of foresight and chance that went into the result.
Also, I have another site aimed more at the professional market and less at the consumer side. Please check out www.jamiesquire.com. There is a Nascar gallery on there as well in case anyone was interested.
Thanks!
_______
(DH again)
The important thing to understand here is that both Jamie and Matt are professionals. Which mean that (A) they know enough to put themselves in position to catch a little luck and make a great shot. And (B) if collaboration is the best way to do it, that is how it is gonna happen.
Again, the overriding goal is to get the best coverage possible for their organization, which in this case happens to be Getty. Pictures come first, egos second. But that's not to say that they are not still peeing-in-their-pants happy when they first see a frame like this one pop up on the screen.
Best of luck with your new private equity bosses at Getty, guys. And thanks much to Jamie for the back story on an amazing shot.
____________
There was confusion in the comments on both the technical stuff, and on the seemingly similar photos made by fellow Getty shooter Matthew Stockman. This kind of thing happens way more than you'd imagine when teams of shooters cover big events.
But it is important to understand that what is important is producing the best overall coverage possible as a team, without hot-dogging and shot duplication.
Jamie Squire: How It Was Done
I was on the flagstand for the race and for the finish. Matthew Stockman and I set up the remote before the race. I chose the location. I climbed up the 20-ft ladder and positioned the camera. I came up with the exposure.
It was shot with at Shutter priority -1 stop. (1/30th to be exact.) The camera data shows the aperture at f9. The star effect was a happy accident.
It worked as planned: I deliberately set the slow shutter speed to catch the strobes and underexposed as I knew the flashes might make the subject too hot. The sheer number of strobes that were caught was luck.There were several other frames that looked nice as well with various strobe patterns, but this was the best with the circular shape of the Gatorade.
The only part that didn't go as planned was that Newman was supposed to turn back toward his crew. I guess he forgot! And, a few of the guys ran off with all the Pocket Wizards I provided! Ha!
Matthew fired the camera from victory lane -- and it was his camera.
It was purely a collaborative effort. When this happens, there is always the controversy over whose shot it is.
One way to solve this is to list joint credit. The images from this camera could have been credited Jamie Squire/Matthew
Stockman. Matt and I have worked together for years. Every year we do the Kentucky Derby and set several cameras in the dirt. Then we divide up the cameras and whichever shots come out of those cameras is how we credit those photos, even though we did the work together for all the cameras.
In this case, there were several usable images. We each chose a couple we liked and put our names on those. So, the similar images on the Getty site did come from the same camera, but are credited differently.
My shot ran in USA Today. Matt's ran in NY Times. Either way, we were both pleased with the outcome.
Maybe that will satisfy everyone's curiosity. I don't think the debate over the credit should diminish the amount of foresight and chance that went into the result.
Also, I have another site aimed more at the professional market and less at the consumer side. Please check out www.jamiesquire.com. There is a Nascar gallery on there as well in case anyone was interested.
Thanks!
_______
(DH again)
The important thing to understand here is that both Jamie and Matt are professionals. Which mean that (A) they know enough to put themselves in position to catch a little luck and make a great shot. And (B) if collaboration is the best way to do it, that is how it is gonna happen.
Again, the overriding goal is to get the best coverage possible for their organization, which in this case happens to be Getty. Pictures come first, egos second. But that's not to say that they are not still peeing-in-their-pants happy when they first see a frame like this one pop up on the screen.
Best of luck with your new private equity bosses at Getty, guys. And thanks much to Jamie for the back story on an amazing shot.
SF As One - Thanks for the Memories
With winds clocked at 60 mph on Pier 39 and rain pouring off and on (mostly on), the weather was hardly ideal for the As One user gathering last Saturday, February 23. The precipitation couldn't put a damper on spirits, though, as approximately 200 'Tubers braced against the storm and embraced their friends from YouTube. To make the occasion extra memorable, Mr. Safety, the organizer of the event, arranged a free cruise around the bay.
This was my third time attending a gathering in the last year, and I must say that each event has been a unique experience. While this was the first time out for some users, many veterans of previous community meet-ups attended as well. There were some awkward smiles as people met for the first time in person, but it seems these events have become quite natural. Several YouTube staffers stopped by to chat and give out T-shirts, and we walked away feeling the love flowing freely amongst the community.
For those of you who couldn't make it out, here's a playlist of some of the videos from As One. Hopefully these will inspire you to make it out to one of these community-organized events in the future.
And if you are hosting an upcoming gathering, do reach out and let us know.
Until next time,
Big Joe Smith
The YouTube Team
Tuesday, February 26, 2008
Who Are Your Photos Really For?
 (By Olaf Blecker, via The F STOP)
When you make a portrait of someone, who are you trying to please? The subject? Yourself? The editor of a publication?
All three? (Heaven forbid.)
As an editorial shooter, I was always trying to please me first and the publication second. And if I made the subject happy, too, that was fine. But I never expected to please all three.
More after the jump.
__________
Olaf Blecker, who is featured in the current edition of The F STOP (and who shot the above portrait of author Phillip Roth) is absolutely not trying to please his subjects. In fact, some people specifically request that they not be shot by him. Which, IMO, is one of the main reasons why his photos are so interesting.
Magazines (WIRED comes to mind) do not exist only to be filled with namby-pamby, flattering photos of people. (How boring would that be?) And yet, if your first goal is to please the person sitting for your photo, that is exactly where you might be headed.
Finding a unique (and perhaps less-than-flattering) lighting style can be the first step in defining a new look for yourself. In its current issue, the F STOP magazine interviews Blecker, who shares lighting info, post-processing techniques and weaves a very interesting discussion on the different forces at play in creating an interesting portrait.
For instance, in the photo above, he is working with two lights (one in an umbrella, one in a diffused reflector) with some very simple post processing. I wouldn't shoot my mother-in-law like that, but I find Blecker's approach very interesting. And it has me thinking about my own lighting.
See the full interview at the F STOP mag here, and see more of Blecker's work at his website.
Road Trip: Heading to Dubai for Gulf Photo Plus

If you are reading this from the Middle East, and/or looking for an excuse to get to one of the most exciting cities on the planet, I'll be teaching at the 2008 Gulf Photo Plus seminars in Dubai from April 29 - May 4. Classes will be at the Dubai Knowledge Village, seen above.
We'll doing it long-form this time, so no more squeezing stuff into a single day. Other teachers include Joe McNally, Chase Jarvis and many more.
More after the jump.
______________
First off, the one thing that pisses me off about the week of seminars is that I will be teaching full-time, and therefore unable to attend any of McNally's classes.
For those of you who are unfamiliar with McNally, he's been around the block a few times, having cut his teeth covering the U.S. Civil War for Life Magazine using off-camera magnesium powder.
Fortunately he wrote it all down in a book, the first printing of which unfortunately sold out faster than a Hannah Montana concert. But he also has been a very busy blogger of late, so you can always read his stuff there.
At least I get to hang out with him after hours and maybe learn something by osmosis at the bar.
Joe and I are kinda hoping that Chase will save us a seat on his private jet, so we do not have to fly over there via steerage class. Chase will be teaching a course dissecting a commercial shoot, start to finish.
As for me, I'll be teaching small flashes in a more expanded format than my usual fare. Their conference, their format. We'll be doing two, two-day seminars. One will be geared towards newbs, and the other towards more experienced flashers. This is a nice departure for me, as we always run out of time in the one-day format.
As an aside, I'm wondering how I will do, climate-wise, in a country where the summer daytime temperature is, like, 527 degrees Fahrenheit and the wearing of shorts is frowned upon.
(Air conditioning. Lots of air conditioning.)
Anyhoo, there's lots more course information here, and the main info page is here.
Hope to see you there. Please bring me some ice.
New Experimental Personalized Homepage
Something we chat a lot about here at YouTube are ways to make it even easier to discover great videos that you'll find interesting. That's why, in the coming days, we'll make an experimental version of a new YouTube homepage available to a small group of users chosen at random. If you're not in the initial group that tests the experimental homepage, but want to give it a whirl, you'll be able to in the near future. We'll post another blog with a link to give everyone access.
What will this homepage look like? Glad you asked!
Alongside homepage regulars like Featured and Most Popular videos, the experimental homepage will include personalized recommendations, the latest videos from your subscriptions and an easier way to see what your friends are uploading, favoriting and rating. Here's a bit more information on what this means:
Recommendations: With tens of millions of videos on YouTube, finding the perfect video to watch can sometimes be challenging. That's why, based on what you've viewed and favorited in the past, you'll see an algorithmically-selected set of videos that you otherwise may never have discovered.
Latest From Your Subscriptions: It's no secret that many people jump for joy when their favorite video creators upload new material. To help you keep track of the most current activity, we've changed the layout that displays newly added videos from your subscriptions. You'll be able to see videos from your three most recently updated subscriptions.
Friend Activity: The experimental YouTube homepage includes a "Friend Activity" feature to make it easier to stay in the loop on all the great vids your buddies are buzzing about. If you already display your favorites, ratings, or uploaded videos on your channel, then your existing, confirmed friends will receive a feed of updates when you favorite, rate, or upload. Remember, you control your list of friends on YouTube. You also control the activities that appear to others on your channel and now in your friends' feeds. Just click on the "Channel Design" link once you've clicked on the "Account" link at the top of any page to turn on features or turn off features you don't wish to share publicly or in your friends' feeds.
In addition, we include a dashboard that places stats about your Inbox and information about your videos front and center. The new display also showcases stats such as your uploads, total views, number of honors and more.
The goal with all of this is to gauge people's interest in having a YouTube that's tailored to the individual. Ultimately, we want to get you one step closer to the videos you'll enjoy most every time you come to the site. We're excited to hear your thoughts on the personalized YouTube experience and we welcome your feedback.
Again, when the link to the new experimental homepage is available, we'll let you know so keep your eyes on the blog!
The YouTube Team
Monday, February 25, 2008
RadioPoppers in the Wild
 The guys from TriCoast Photo have gotten a chance to play with the new RadioPoppers, and dropped a juicy comment in tonight just to make all of you short-range TTL'ing chumps jealous.
Their comments, and a link to full post with pix, after the jump.
____________
From TriCoast comment:
Hey we just tested out the Radio Poppers first hand at our Wireless flash and Video light workshop in San Diego yesterday and today.
I must admit I was somewhat worried as everyone has been on this product since it seems to be to good to be true. Blending the vast control aspects of the IR of the eTTL and iTTL methods with the Pocket Wizard security of radio waves.
Well this past few days TriCoast has been one of the first group of people to really test these little guys out.
First and foremost THEY ARE REAL, nice little packages, simple to store in your camera bag and easy to "attach" to your flash units. After a very quick run down on them by Kevin King we were off shooting and well without any problems what so ever.
I used my Mark (sic) body with my 580ex on my camera as MASTER and a 580ex II as my Slave unit and all functions of eTTL along with the power adjustments from the Master flash worked without any problems. I took the first shot, the flash (which had the IR sensor taped up - covered) fired, exposing the subject with too much light. I simply lowered the flash output on the flash by a little bit, took another shot and got PERFECT exposure and image.
Radio Poppers truly gives me the best of both worlds.
Teaching wireless flash around the world this product will change my method of teaching as well as personally shooting.
So in Summary:
Radio Poppers ARE REAL
Radio Poppers WORK
___________
More, and lotsa pix, at the TriCoast blog.
Sunday, February 24, 2008
Reader Question: What Zoom Setting for an Umbrella?
Reader Jmolli asked the following question in the Strobist Flickr threads. Given that there was no single correct answer, I thought it was worth a little bit of discussion:
Hit the jump for some ideas -- and a couple examples.
______________
The first thing you have to ask yourself before choosing the flash setting for your umbrella is, how big do you want your light source to be? But before we get to that, let's make sure we all know what we mean by "zoom setting."
Remember, your flash was designed to provide coverage for a wide array of lens focal lengths when the flash is mounted on camera and firing in the direct mode. But that was (hopefully) way back in the dark ages for you. And most likely, you are now using the zoom function of your flash for more creative purposes.
By zooming from the typical 50mm setting out to, say, 24mm, you can make a flash with a beam of light that will spill into a wide area -- but at a (relative) cost of light intensity. By zooming the same flash out to, say, 85mm (or even 105mm) you can push that beam out in a more narrow -- but stronger -- pattern. If you need coverage, you go wide. If you need strength (or beam restriction) you go a little more tele.
So how much zoom for an umbrella?
That depends on whether or not you want to make use of the whole thing as a light softener. You may wish to tighten that umbrella from a 43" light source to a smaller one by zooming in the flash, or "choking up" on the umbrella shaft.
 Here is a good example of using a small portion of the umbrella. This is Rick, from a seminar I did in Seattle last year. I shot him with the umbrella in close, because I did not want to contaminate the background. (We were lighting the wall with a CTO'd strobe through some drinking glasses to create a pattern.)
Since the light was so close, I choked up a little on the umbrella shaft, which kept the light from getting too soft and pretty. One does so want to preserve Rick's handsome, chiseled features and not go too milk toast on him with the light.
By choking up on the shaft, I not only make the effective light source smaller but I also make sure the flash cannot see the background directly. Remember, not all of the umbrella is being lit by the flash, so I am not going to get any raw light leaking past the umbrella's edge.
Huh?
Follow me: If the flash can see the wall directly (past the edge of the umbrella) you can get some raw light on the background. As long as that raw light is hitting an area outside of your photo, it's cool. Take this photo, for example:
 This is a wide shot I grabbed while shooting a basketball player with a shoot-through umbrella. You can see that the "soft-lit" area is actually the shadow of the umbrella itself.
And since the edge of the shadow falls outside of where I will be framing the shot, I have no worries.
If I needed to fix this, I could do it in a number of ways. I could tighten the beam spread on the flash, choke up on the umbrella or move the umbrella further away from the subject -- all would work fine.
 But this test shot, taken when setting up for an 11-person group photo, leaves me with a problem. The shadow edge of the umbrella (seen at right on the background) will be in my final photo. I would definitely have to choke up on the umbrella -- or zoom the flash in -- to fix it.
__________
So, before you consider whether or not you have to fill the whole umbrella to get the most size to your light source, you need to check your edges with a test photo to see if you are getting any unwanted spill. If that is not an issue, you can choose to fill the whole umbrella with light by zooming out to 24mm and placing the flash at the far end of the umbrella shaft.
This way, you'll fill your umbrella with light -- but there will be some spilled raw flash to watch out for. It is all a balance, based on what you need.
When using a shoot-through umbrella, your flash will usually not be aimed or positioned in a way to where the raw light will be a problem with lens flare. That's because your umbrella will be pointed at the subject, and the flash pointed at the umbrella.
Not so a reflective umbrella, which could likely be between your camera and the subject (a little off to one side) with the flash pointed back towards you. And that could cause you problems.
In that case, you simply want to stick a short little gobo on the side of your flash which would cause you some raw-light flare problems. Not too much of a gobo, mind you. You'll be eating up some umbrella coverage from the flash, so you do not want to overdo it. Just make it so that the camera cannot see the raw flash head sitting there on the other side of the reflective umbrella.
In general, with flashes and umbrellas, I tend to go with the 24mm setting to get full coverage. Then I gobo off the raw spill light from my camera if needed.
Quick Visualization Tip
To easily see where your umbrella shadow edge will fall before firing the first shot, just sight the umbrella from the position of the flash. This makes for a quick-and-dirty way to check things out while you are still setting up. You'll solve many problems before they have a chance to appear with this one, simple technique.
So, long-story short, how you zoom a flash in an umbrella depends on a lot of things. But if you first decide how much umbrella coverage you need and take care of your spilled raw light, it should work itself out.
___________
Do you have a lighting question you'd like to see answered? Just stick it in a comment. If I think it could be of use to a lot of people -- and we have not talked about it before -- It might show up as a future post!
"I have 32" and 43" convertible shoot thru/reflective umbrellas. I usually set the zoom on my SB-26s to 24-28mm when shooting thru the umbrellas and at 50-70mm when bouncing off of them. I've snapped shots of the umbrellas with the flashes triggering and it looks like they are evenly lit in both situations.
I'm curious to know what other people are using for zoom settings when shooting thru or bouncing off of umbrellas. I use the short zoom on the shoot thru because I usually have them fairly close to my subject and at higher zoom settings the light gets harsh. When bouncing I'm usually further away so I up the zoom."
Hit the jump for some ideas -- and a couple examples.
______________
The first thing you have to ask yourself before choosing the flash setting for your umbrella is, how big do you want your light source to be? But before we get to that, let's make sure we all know what we mean by "zoom setting."
Remember, your flash was designed to provide coverage for a wide array of lens focal lengths when the flash is mounted on camera and firing in the direct mode. But that was (hopefully) way back in the dark ages for you. And most likely, you are now using the zoom function of your flash for more creative purposes.
By zooming from the typical 50mm setting out to, say, 24mm, you can make a flash with a beam of light that will spill into a wide area -- but at a (relative) cost of light intensity. By zooming the same flash out to, say, 85mm (or even 105mm) you can push that beam out in a more narrow -- but stronger -- pattern. If you need coverage, you go wide. If you need strength (or beam restriction) you go a little more tele.
So how much zoom for an umbrella?
That depends on whether or not you want to make use of the whole thing as a light softener. You may wish to tighten that umbrella from a 43" light source to a smaller one by zooming in the flash, or "choking up" on the umbrella shaft.
Here is a good example of using a small portion of the umbrella. This is Rick, from a seminar I did in Seattle last year. I shot him with the umbrella in close, because I did not want to contaminate the background. (We were lighting the wall with a CTO'd strobe through some drinking glasses to create a pattern.)Since the light was so close, I choked up a little on the umbrella shaft, which kept the light from getting too soft and pretty. One does so want to preserve Rick's handsome, chiseled features and not go too milk toast on him with the light.
By choking up on the shaft, I not only make the effective light source smaller but I also make sure the flash cannot see the background directly. Remember, not all of the umbrella is being lit by the flash, so I am not going to get any raw light leaking past the umbrella's edge.
Huh?
Follow me: If the flash can see the wall directly (past the edge of the umbrella) you can get some raw light on the background. As long as that raw light is hitting an area outside of your photo, it's cool. Take this photo, for example:
This is a wide shot I grabbed while shooting a basketball player with a shoot-through umbrella. You can see that the "soft-lit" area is actually the shadow of the umbrella itself.And since the edge of the shadow falls outside of where I will be framing the shot, I have no worries.
If I needed to fix this, I could do it in a number of ways. I could tighten the beam spread on the flash, choke up on the umbrella or move the umbrella further away from the subject -- all would work fine.
But this test shot, taken when setting up for an 11-person group photo, leaves me with a problem. The shadow edge of the umbrella (seen at right on the background) will be in my final photo. I would definitely have to choke up on the umbrella -- or zoom the flash in -- to fix it.__________
So, before you consider whether or not you have to fill the whole umbrella to get the most size to your light source, you need to check your edges with a test photo to see if you are getting any unwanted spill. If that is not an issue, you can choose to fill the whole umbrella with light by zooming out to 24mm and placing the flash at the far end of the umbrella shaft.
This way, you'll fill your umbrella with light -- but there will be some spilled raw flash to watch out for. It is all a balance, based on what you need.
When using a shoot-through umbrella, your flash will usually not be aimed or positioned in a way to where the raw light will be a problem with lens flare. That's because your umbrella will be pointed at the subject, and the flash pointed at the umbrella.
Not so a reflective umbrella, which could likely be between your camera and the subject (a little off to one side) with the flash pointed back towards you. And that could cause you problems.
In that case, you simply want to stick a short little gobo on the side of your flash which would cause you some raw-light flare problems. Not too much of a gobo, mind you. You'll be eating up some umbrella coverage from the flash, so you do not want to overdo it. Just make it so that the camera cannot see the raw flash head sitting there on the other side of the reflective umbrella.
In general, with flashes and umbrellas, I tend to go with the 24mm setting to get full coverage. Then I gobo off the raw spill light from my camera if needed.
Quick Visualization Tip
To easily see where your umbrella shadow edge will fall before firing the first shot, just sight the umbrella from the position of the flash. This makes for a quick-and-dirty way to check things out while you are still setting up. You'll solve many problems before they have a chance to appear with this one, simple technique.
So, long-story short, how you zoom a flash in an umbrella depends on a lot of things. But if you first decide how much umbrella coverage you need and take care of your spilled raw light, it should work itself out.
___________
Do you have a lighting question you'd like to see answered? Just stick it in a comment. If I think it could be of use to a lot of people -- and we have not talked about it before -- It might show up as a future post!
Thursday, February 21, 2008
Meetup Assignment: Group Shot
 For those of you attending meetups, here's a thought: Why not take the opportunity to try a cool group shot?
That's what the folks at the South Bay (SF / Silicon Valley area) did.
You have a roomful of lighting gear, subjects and (presumably) thinking photographers. What more do you need?
As line-em-ups go, the above example is pretty cool. But you can also get a little more conceptual with it: Make a quick, well-lit shot of everyone there as an exercise. Then maybe grab four or five people and try your hand at an album cover concept, or an ESPN Magazine cover of an offensive line. Play with it a little.
I can tell you that I am working on a group shot using a coupla dozen readers that will raise the bar a little bit. (I'd tell you more, but I'd have to kill you.)
And if you want to keep tabs on local meetups, you can easily do so by searching in the drop-down menu on the sidebar.
-30-
Westcott PhotoBasics: Learn to Light, the Arthur Murray Way!
 UPDATE: The flashes are available now. Also, a promo video has been added after the jump.
FJ Westcott, makers of our much-beloved double-fold umbrellas, has announced a new series of reasonably priced monobloc strobes.
(Yeah, yeah, Dave -- them and everybody else at PMA this year...)
But no, wait -- Westcott is including with the lights an instructional DVD and a full-size floor chart showing you where to actually place your lights when you shoot people.
Clunky though the "lighting mat" idea may be, you have to give Westcott props for picking the ball and teaching its end users about at least how to begin to light with their new flashes. That is way cool.
More on this Westcott's sprouting of educational antlers after the jump.
_______________________
 Westcott's new line of flashes are called "StrobeLites". They are 150- and 200-watt-second AC flashes, designed as an all-in-one unit. They are best suited for people- and small-product shooters who wants to get into controlled, quality light for not too much money.
You really have to give Westcott props for including a 2-hour instructional DVD in the "educational kit" packages, along with the floor mat thing.
Is it perfect? No, but it is a big step in the right direction.
FWIW, Elinchrom is also doing the DVD thing with the D-Lites. IMO, the companies that get the idea of leveraging their lighting gear with educational content add huge value to the proposition, at very little marginal cost.
Question: Why does it fall to a middle-aged newspaper shooter to create an ongoing conversation about light? Because no one else was doing it in any kind of comprehensive manner. Consider the economic incentive for a lighting company selling modestly priced gear to have created what we all have built here together.
And yet to date, not a single one has even tried it on a consistent basis. I can say that from my conversations with other lighting gear folks, Westcott is not the only one starting to see the value in educating its customers, both current and potential.
Will Westcott take the education ball and run with it? Who knows -- although they certainly passed up the education opportunity in video below. The idea of merging basic lighting gear with basic education is a great start. This creates an informed shooter with each purchase, and grows the pie for all lighting gear manufacturers.
In a crowded field of "me-too" small, AC strobes, Westcott has differentiated themselves from the pack not by the design of their strobes but by their idea of educating new lighting photographers. Although, to be fair I have not seen one yet. The flashes themselves could be the cat's meow, for all I know.
Way to go, Westcott. Let's hope they are not the last to do this kind of thing.
Cheesiest. Video. Ever.
And while we have you Westcott folks on the line, I would like to ask a teensy-weensy favor on behalf of roughly 200,000 other photographers in the room with us: On the next double-fold umbrella run, could you maybe start including a two-inch plug of solid plastic in the end of the telescoping, hollow umbrella shafts?
That way we won't have to jam pencils up into them to make them the perfect little umbrellas.
_________________________
:: Westcott StrobeLite Kits Page (See "Educational Kits") ::
:: StrobeLites Tech Specs PDF ::
Tuesday, February 19, 2008
The Simple Light: Platon Videos
UPDATE: Apparently, Platon's site is not equipped to handle the inbound traffic level you guys are generating. Long story short, we sorta crashed it. That was certainly not our intention, and they are working on it as we speak.
UPDATE #2: He's back up!
__________
 If you aren't familiar with the work of British photographer Platon (pronounced "plah-TOHN") you should check his stuff out. The A-List editorial and commercial photog shoots almost all of his photos with one soft frontal light source (sometimes adding a background light) and a wide-angle lens.
You'll see lots of stuff that you'll recognize on his site - he did that controversial shot of Bill Clinton, spread-eagle in chair for Esquire for example. (He coaxed the expression by asking the President to "show me the love.")
His site has an "interviews" page, containing three videos, all of which I all found very interesting. This guy is working with a simple (albeit not cheap) setup and continues to explore a very well-defined lighting style through his body of work. Nothing particularly complex about it, either.
This is the kind of stuff you can do at home with your dSLR and an umbrella'd speedlight. But the devil, er, the quality, is in the details. And Platon's example is an excellent lead to follow if you are looking to expand your thinking without expanding your gear bag.
One thing to pay close attention to while watching these videos is the way he interacts with his subjects. Once the light is set up, that's really what makes the photos.
:: Platon's Website ::
:: Platon Videos ::
-30-
UPDATE #2: He's back up!
__________
If you aren't familiar with the work of British photographer Platon (pronounced "plah-TOHN") you should check his stuff out. The A-List editorial and commercial photog shoots almost all of his photos with one soft frontal light source (sometimes adding a background light) and a wide-angle lens.You'll see lots of stuff that you'll recognize on his site - he did that controversial shot of Bill Clinton, spread-eagle in chair for Esquire for example. (He coaxed the expression by asking the President to "show me the love.")
His site has an "interviews" page, containing three videos, all of which I all found very interesting. This guy is working with a simple (albeit not cheap) setup and continues to explore a very well-defined lighting style through his body of work. Nothing particularly complex about it, either.
This is the kind of stuff you can do at home with your dSLR and an umbrella'd speedlight. But the devil, er, the quality, is in the details. And Platon's example is an excellent lead to follow if you are looking to expand your thinking without expanding your gear bag.
One thing to pay close attention to while watching these videos is the way he interacts with his subjects. Once the light is set up, that's really what makes the photos.
:: Platon's Website ::
:: Platon Videos ::
-30-
Monday, February 18, 2008
Jamie Squire Finishes Strong
 UPDATE: A USAT photo editor reports that Jamie shot this with a remote cam, available light, set to shutter priority at -1 stop to catch the strobes.
I woke up in my hotel in Orlando to find this USA Today sports section on my doorstep from last night's Daytona 500.
On behalf of my pal (and Getty sports shooter) Jamie Squire, I would like to thank the eighteen photographers whose flashes he borrowed to use as backlights by using an available light exposure while shooting from the reverse angle.
Be assured that Jamie very much appreciates all of your hard work and timing. And he would like to show his gratitude by including each and every one of you in his USAT lead sports photo today.
You can see the page big here, or visit Jamie's Website [click "portfolio," then "sports"] to see his other great sports photos. Which should pretty much convince you that his was not luck.
And if you want to see why Getty brings people like Jamie in from out of town to cover a big race, take a look at Jamie's photos from the event.
-30-
Live the Dream with Sketchies II
Calling all comedy troupes, sketch commandos and improv teams -- Sketchies is back! Our sketch comedy contest blew up big in 2007, and
You can check out all the details of this year's contest on our Sketchies II channel page: how to enter, what you can win and the deadlines you simply can't miss. If you love to make comedy videos, this is your chance to shine. And it doesn't hurt to have a bit of a competitive streak, because the winner of all that cash is going to have to survive the first round of voting, then make a second video for the final Sketchies II showdown. Last year's contest drew over 5,000 entries and saw many talented video makers rise to the challenge.
Sketchies veterans Lisa Nova and last year's winners, Awkward Pictures, are set to kick off the program and get the comedy rolling. If you need a little extra inspiration, check out last year's winning video:
Think you can do better? Then show the world, and you could end up living your big-bucks comedy dreams.
Cheers,
Mark D.
YouTube Comedy
Sunday, February 17, 2008
Lighting 102: 5.2 - Assignment: Double-Duty Light
 Today's Lighting 102 assignment is simple, in theory. Your job is to create a photo, using just one flash, that makes use of reflective surfaces to create light coming from multiple directions.
Sounds easy enough. But there is a little twist. More after the jump.
____________________
Technique-wise, this assignment is just as simple as it sounds. You'll be using one flash, which you can combine with ambient light if you like. But you'll be stretching it to make it do double duty. Or triple duty. Or more.
This assignment is a little different from what we have been doing up until now, in that this is more than just a technique-based photo. This is also a conceptual shoot.
Realizing that 85% of the people who read this site are amateurs, I wanted to introduce an element of your having to produce a shot designed to illustrate a concept. This should give you an added layer of complexity. But I am also going to include a choice of three concepts just to make things a little easier.
Before we get to that, a roadmap to help you conceive your shot.
Concept, Subject, Light, Gesture
Normally, a photographer would get an assignment to illustrate a single concept. And you'd think you would want a nice, big, general concept, right?
Maybe not. In my experience, those are more difficult to do than the niche stuff. It just a matter of having to many choices.
Once your concept is narrowed down, you need to choose a subject that you will use to illustrate it. One earlier example on this site is this On Assignment post, from a shot to illustrate winter book clubs. We chose as our subject origami chairs, made from the pages of classic books.
Physical subject chosen, we next had to design the light. In the above case, I was trying to mimic a dark night and fire from a fireplace. (You can read the whole assignment post on the other page, so I won't dupe that here.)
But the point is that the physical subject had to exist before we started to figure out how to light it. If you think of this as a linear creative process, it starts to work itself out a little. How you interpret the concept will point you to your representational physical subject matter.
The choice of subject will help you craft a lighting scheme -- within the bounds of this assignment, in this instance -- and then you are on your way to making a photo.
If your subject is a person, you'll also want to pay careful attention to the gesture you elicit, as this last step with either make or break the photo. Not that a person is required. But if you use one, don't drive the ball 99 yards and screw it up because the person's gesture is totally wrong for your concept.
First Things First
How will it be used?
Even if you do not have a publication venue in mind, it helps to make one up in your mind to act as a guidepost. This will help you to visualize the photo you want to make and give you some boundaries that will help you make your choices along the way.
Choosing a venue will help you get the creative ball rolling.
Mind you, for the pros, the venue is typically already chosen, as is the concept. And frequently, the subject is pre-selected, too. Each of these pre-chosen variables can be a blessing or a curse. But this time, for better or worse, you are driving.
Your Choices
Here are the three conceptual choices for your assignment. Choose one:
1. Financial Planning.
2. Going Green.
3. Physical Fitness.
Three simple concepts, with many possible choices.
I'm Playing, Too
As mentioned in the reflect/refract post, I am gonna be doing this one, too. I will write it up as an On Assignment and throw my thought process into the ring along with everyone else. And, FWIW, I'll share some of my choices here.
My concept choice will be #1, Financial Planning. It is an avocational interest of mine, so I know enough to at least get started thinking about it.
My potential end venue will be the blog, "Get Rich Slowly," which is run my friend, J.D. Roth. He has no idea I will be shooting a conceptual photo for him to use, and will likely only find out when he sees his inbound traffic from my site today. (Hi, J.D. -- Surprise!)
If he wants to use it, fine. If not, fine. But the point is that having an end use in mind will help to guide me through the decision-making process.
That's where I am going with it. More later.
___________
For this assignment, your tags will be:
Strobist
Lighting102 (note, no spaces)
Reflect
Please tag only one photo with the above three tags. And remember: One flash, stretched with reflectors. That's the technique we are using.
You can see all of the photos from this assignment here. Discussion for the assignment is here.
The assignment is due at the end of the day on March 3rd.
NEXT: Discussion - Double-Duty Light
Saturday, February 16, 2008
The Berlinale Talent Campus on YouTube
This weekend, the 58th annual Berlin International Film Festival wraps
up and, with it, the sixth annual
summit for 350 young filmmakers to attend lectures, classes and panel
discussions and to work on their own projects in hands-on workshops.
For the second year, the
featured a special program called the Garage Studio, a production
platform for four lucky filmmakers to shoot and edit a short film for
the Internet under the tutelage of master filmmakers and using amazing
production resources. (Mike Figgis, the award-winning director of
Leaving Las Vegas and Internal Affairs, was one such mentor.)
The best part? You can see the final four films, plus behind-the-scenes
footage from the
For more information on the
website and
think about applying next year - for any aspiring filmmaker, it is an
opportunity not to be missed!
Happy viewing,
Sara P.
YouTube Film
Thursday, February 14, 2008
One-Minute Lighting Tip: Lighting on Two Planes
 Quick, what color is the tile that this Turkish candy is sitting on?
If you said green, you should probably hit the jump to learn about how lighting on two planes gives you more control over your photos.
________________
First things first: The tile that the candy on is actually black.
Second, let's walk through the light reader Nionyn used for the shot and see what's what.
The main light is a gridded Vivitar 283, coming in from front camera left. The second light is another Vivitar 283 from back camera right. The third light is yet another 283, gelled green, aimed at the wall which is out of the frame behind the candy sitting on the black tile.
So, what you are seeing in the foreground is the (gelled green) lit wall being reflected in the black tile that the candy is on. In other words, in this shot, the black tile is essentially a mirror.
Since the front tile is black, the green wall is not being contaminated with any pre-existing tone or color from the tile in the photo's foreground. And since the candy is being lit by two gridded 283's, the light hitting the candy is not spilling onto the back wall. Thus, the smooth, intense color around the candy.
The two items (candy and wall) are being lit on two completely discrete planes. And the fact that the tile is reflecting the back wall (because of the camera position) is what brings it all together.
58... 59... 60.
____________
Related reading:
DIY Macro Box Shoot w/Black Granite
NBA All-Star Vlog Squad
This weekend marks one of the biggest moments of the basketball season with the NBA's midseason showcase event: NBA All-Star. This year, the league's brightest stars will be gathering in New Orleans, Louisiana, for various events, including the Dunk Contest, Skills Competition, Rookie Challenge Game, and, of course, Sunday's All-Star Game. These events will be broadcast on TNT, but here on YouTube, we'll have a unique slice of All-Star action.
Two groups of intrepid students from the Laurel School, located in Orleans Parish in New Orleans, were given video cameras to document the rehabilitation of their outdoor courts and the re-opening of their gymnasium, all of which were damaged by Hurricane Katrina two years ago. NBA players Al Horford and newly-anointed All-Star David West will be on site to lend a hand to the students and volunteers. Here's an interview with Horford at the unveiling ceremony:
On Friday, another group of Laurel School students will be given special press access to the Rookie vs. Sophomore Game. All of the footage captured by these aspiring sports journalists will be living on the NBA channel and on the NBA Cares channel. So in-between the spectacular dunks and behind-the-back passes, log on to YouTube for a special behind-the-scenes look at All-Star in the Big Easy.
Thanks,
Andrew B.
YouTube Sports
Tuesday, February 12, 2008
No Direct Flash, Please. We're British.
UPDATE: Swapped to a better version of the video. Runs smoother and has more stills.
The folks in Seattle know they are cool. They work their big-bucks day jobs and then meet up at night to flash each other in airplane hangars.
But across the Atlantic in Croydon (near London) at The Croydon Advertiser, they get to do this small-flash lighting stuff all day long and get paid for it. In Pounds Sterling, no less.
Never heard of the Croydon Advertiser? It's where "SitBonzo" (AKA David Berman) works. And if anything could be cooler than British TV, it would be an instructional British lighting video, of course. Click the icon at bottom right on the screen to video it full screen.
(Eatcher heart out, Ogalthorpe.)
_____________________
More Croydon lighting hijinks -- and stills, for the commenters who asked -- here.
-30-
RadioPopper Photos Posted
 Kevin has just posted a series of photos of the upcoming RadioPopper wireless piggyback units, which are designed to vastly extend the range of wireless TLL flash systems such as those used by Nikon and Canon DSLRs.
 Still in the ugly-electronic-guts stage are the new dumb (non-TTL) radio triggers, which promise a four-digit range at a two-digit price.
Or, of course, these could just be clever Photoshop creations if you are still in the Vaporware/Capricorn One crowd.
See the RadioPopper blog for several more shots of receivers and transmitters, and a full run-down of recent RP anouncements.
-30-
Sunday, February 10, 2008
Lighting 102: 5.1 -- Refract and Reflect
Okay, show of hands: How many people have been trying to do this Lighting 102 stuff with just one flash?Don't feel so bad. Back in the day, lighting guru Dean Collins was only allowed to use one light source for his first year of studying his craft at school. And he did just fine, thank you.
Whether you have one light or twelve, the trick is making them look like more is knowing how to stretch them into doing double-, triple- and even quadruple-duty for you. Or you can just take that one light and give it some texture -- a little more interestingness.
By reflecting and refracting light, you can pimp it up like a college student making a gourmet meal out of ramen noodles and a few Taco Bell fire sauce packets. Hit the jump for more.
________________________
For the most part, light from your flash starts out looking pretty yucky. We have learned how to move it around, soften it up and restrict it, but you can also bend it, or shoot it right back at itself.
In fact, before the light ever leaves your speedlight, it has already been refracted. The fresnel lens on the front of your strobe bends the rays to make them spread out wide or zoom in tight. But who's to say that you can't do a little more of that kind of stuff after the fact?
 At left is a photo of photographer Ant Upton, who did this cool guest On Assignment of a soccer player in Paris a ways back. I shot him during a lighting seminar in London last year.
Before we lit it, the backdrop for this photo was an speckled grey room divider. A gelled flash took care of the drab color. But the subtle pattern was created by shooting our background flash through a water pitcher to bend the light around in a funky way.
This is the kind of thing that can turn a plain-jane background into something with a little texture to it. I do these lighting gigs in typical, boring hotel conference rooms, and I often have to scrounge for something to make the light a little more interesting. I have to go with what I have on hand, and frequently, that means a stack of water glasses or a pitcher.
In this instance, the trick is to back the flash up a little from the pitcher to make the light point-source enough to create a good pattern as it shoots through. (This also means you are probably gonna get a lot of spill around the pitcher, so I tend to snoot or grid the light to keep the beam tight.)
If you are looking for an even cooler thing to shoot light through, those (cheap) translucent, wavy-glass blocks at Home Depot look even nicer for a light bender. Use your imagination -- light modifiers are everywhere.
________________________
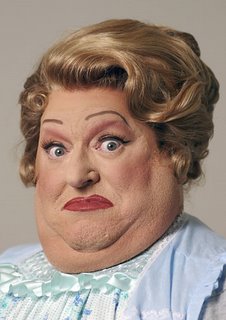 Or, you can easily make one light do the work of two. For this quickie headshot-in-a-corner of actor Bruce Vilanch (in drag for a role in the musical "Hairspray," I stuck a speedlight into an umbrella and used one wall of the corner setting for a backdrop and the other wall as a reflector.
 Bingo: One light becomes main and fill.
(Full how-to on the quickie corner headhot setup here.)
This is simple stuff, and you should always think of a neutral-colored wall as a second light source, waiting to help you fill those shadows.
But refracting light can make it more interesting, and reflecting light can multiply it into something that looks far more complex than it is.
 For instance, you can shoot light through something translucent and use the resulting modulated shadow as a compositional element. A good example is this shot of a pair of glasses, by Ekistoflarex.
 All it takes is a little imagination.
________________________
But especially nifty, IMO, is what you can do with mirrors. And rather than throw an example up for this, I want you to take a moment to previsualize it. This way, you start to build a photo in your mind before you pull out the first (and sometimes only) light.
You want to get to where you can see the light in your mind before you ever start to create it. You want a process you can depend on, not a string of lucky accidents. (Although we'll certainly take lucky accidents when we can get them.)
Imagine a table-top product shot, lit with a single, bare light, say, from directly above. You'd obviously get that "suspect-getting-the-third-degree" kind of light. Which can be cool, depending on the reflective quality of the surface the object it is sitting on.
But say, for the sake of argument, that you happened to drop by Ikea or a home store and bought a pack of four mirror tiles for $5.99.
Now, say you placed two mirrors front camera left and right of the subject, and the other two back camera left and right, too. If you angled them properly, you would turn that one, top-spotlight into a full, five-sided wrap-light setup for just $5.99.
You seeing it?
In fact, you can do a lot of seemingly complex table-top photography with just one real light source, if you bounce that thing around some. That mirror-wrap thing is just an example. You might decide to build your lighting scheme on one (real) rim light with reflector cards and mirrors stretching it into a near-endless set of apparent light sources.
If you are into gelling your light, you could control the color of each of those mirrored light sources individually. You just have to remember that you'll get double the strength out of your gels, because the light gets gelled on the way in and on the way back out when reflecting from the mirror.
(It's an easy fix. You just use half of what you need -- a 1/2 CTO becomes a full CTO, etc.)
If $5.99 is beyond your disposable income limit this week, consider making some foil reflectors. Just a little cardboard covered with aluminum foil can do winders for a small product shot. Remember to crinkle the foil up, then spread it back out, for a nice, even reflector surface.
No assignment today -- just some thoughts to get your gears turning. Just a heads-up to be thinking about what you have -- or can scrounge or buy -- as a set of reflectors. Because our next assignment (which I'll be doing, too) will require that you use one light -- in several different directions at once.
NEXT: 5.2: Assignment | Double-Duty Light
Phoenix Lighting Seminar Registration Opens
UPDATE: The March 15th and 16th lighting seminars in Phoenix, AZ, are both sold out.
The discussion thread for this seminar is here. Full info on the seminars after the jump.
__________________________
Seminar Info and Registration Details
LOCATION:
The class is to be held at the Hilton Phoenix Airport. The address is 2435 South 47th Street, Phoenix, Arizona. You can find a Google map here.
WHAT WE'RE ABOUT:
With these seminars, my goal is threefold: To refine your approach to creating light, to fill you with as many ideas as possible in a day's time and to have fun doing it. We'll start with a roadmap for the day, which I will do my best to keep us on. But each session will take on somewhat of a life of its own. Which is a good thing.
Our Anticipated Schedule
Morning check-in/setup: 9:00 a.m. - 9:30 a.m.
Please plan to arrive between these times, as we will still be setting up before then and still waiting for the caffeine to kick in. Anything you may happen to see onscreen before 9:30 is not part of the event and is only being used for projector testing purposes.
Morning session: 9:30 a.m. until approximately 12:30 p.m.
We'll talk about gear (I'll have a good gear selection there for a petting zoo) and take an extended, integrated look at what is essentially the Lighting 102 material in it's entirety. The focus will be on taking all of the things we talk about on the site in a day-to-day sense and integrating them to gain more of a holistic approach to lighting. Everything really is interrelated.
Lunch Break
On your own, approx. one hour, and we'll be looking for your nearby suggestions in the Flickr discussion thread related to this seminar. Link to a discussion thread will be posted shortly.
Afternoon Session:
~1:30 p.m. - 5:00 p.m.
Assuming we have finished the theory stuff, we'll move into the practical/demo session. (Sometimes we go into a little overtime on the theory.) We'll get into some real-world lighting exercises photographing some models I will have cleverly hidden around the room disguised as ordinary attendees.
This is basically a lighting version of "Whose Line is it, Anyway?" with a focus on improvisational lighting based on available gear, the room, found objects, lighting mods, etc. I never know what ideas we will come up with, which is what keeps me equal parts interested in and petrified of the afternoon session. It's a good thing.
Shortly after each shoot, we will view each setup and discuss the results onscreen. This instant feedback in a group environment is a wonderfully efficient way to drive home the thought and technique process. We can read and write all we want. But for photographers there is nothing better than "monkey see, money do."
The goal will be to incorporate lighting theory, room environment, assignment constraints and our available gear to create a photo that seeks to produce an photograph that is an appropriate response to our situation.
Working within that framework will allow us to concentrate on better freeing ourselves in the other areas: Creativity and subject/photographer interaction.
The entire day will be a non-stop flow of ideas and techniques, punctuated by spur-of-the-moment Q-and-A. I want you to bring lots of questions, and to feel free to voice the ones that pop into your head throughout the day. In fact, if you do not ask me enough questions, I will start throwing some questions at you.
You might want to bring a notebook and pen. (I will have a URL to download the presentation, so you can relax and listen.) And bring a camera if you want to shoot the setups as a visual reference. And dress is casual, so you won't feel out of place if I show up in shorts.
As with my philosophy for the website there will be no secrets and no posturing. This stuff is not rocket science. It's light. And the first step in learning to light is to realize that anyone can get very good at it.
We will plan to wrap up at about 5:00. But if we are still going (and they don't kick us out) who knows. Normally, a fair number of people come back to the hotel bar after dinner, where we discuss lights, darks, ambers -- whatever. Always fun.
If, for some reason, you require a cancellation after booking, refunds will be granted up until March 3rd. After that time, you would be responsible for transferring your seat to another attendee.
Very Important: If, through events beyond my control, I am unable to present this seminar, refunds will be limited to the ticket price. As I already have airfare, hotel room and our venue rental paid in advance, I do not anticipate this happening. But I just wanted to cover all of the bases, in case I get run over by a bus tomorrow, or one of those Big Macs finally catches up to me.
Bases covered, I have to say that I am very much looking forward to this trip and especially to meeting many of you. As I do more of these seminars, I find that each session develops a vibe of its own. You put a few dozen photographers who are all eager to learn in a room, and what starts out as a simple stack of talking points turns into a rich, organic discussion that ends with everyone - including me - having a head swimming with new ideas.
Feedback from Previous Seminars
London:
Post-seminar thread | Extended report
Seattle:
Post-seminar thread | Extended report
Paris:
Post-seminar thread | Extended report
Northern California:
Extended report I | Extended report II
__________________________
Registration Details
The cost for either seminar is $159.00. The two seminars cover the same material, so you would register for either day, but not both.
To register for either seminar (with any major credit card) please click on the link at the bottom of the post, which will take you to PayPal. A PayPal account is not required to register.
IMPORTANT: If you are in the process of registering and the seminar sells out, your fee will be refunded by the end of the day -- usually within the hour.
Please leave your name and phone number (and a working email if different from the PayPal address) in the info box on the PayPal page, in case I should need to contact you.
I look forward to seeing you there. The discussion thread for this seminar is here.
(Note: Both seminars are sold out.)
YouTube Musicians Gear Up for Grammys
The 50th annual Grammy awards on February 10 marks the final crescendo of our MyGrammyMoment contest. All 15 musicians chosen by your votes have been in L.A. this week rehearsing their orchestral contributions to the Foo Fighters' song "The Pretender," but only one will be selected to step out from the crowd as a featured soloist. And did we mention Led Zeppelin bass player and multi-instrumentalist John Paul Jones will be conducting all this?
This group of amazingly talented violinists, cellists and trumpet players from all over the U.S. has been having a whirlwind week in L.A., juggling rehearsals with the Foos and Jones with Grammy Foundation events (where they got to walk the red carpet and rub shoulders with Musiq Soulchild, Natasha Bedingfield and Jerry Lee Lewis). Friday's rehearsal at the Staples Center gave them a chance to watch their fellow Grammy night stars tune up for the big show. (Wasn't that Alicia Keyes who just passed by?) Peek in on the rehearsals, complete with jokes supplied by Dave Grohl and a Foo fan visit from Juliette Lewis:
Tune in to the Grammy Awards on Sunday, February 10, to see all Top 15 YouTube instrumentalists in this once-in-a-lifetime performance; you can also vote right up until the performance for which talented 'Tuber -- Ann Marie Calhoun, Brian Fitzgerald or Tara Klein –- should step out as a soloist. In addition, we're featuring everyone's audition video on the home page today so you can see what sparked this whole experience in the first place.
Live from La-La Land,
Michele K-Tel
YouTube Music
Friday, February 8, 2008
Robert Rodriguez: Master Cheapskate
UPDATE: For those of you with Netflix, the cult classic, full-length movie is now available to stream on demand.
__________
Everybody on the bus -- and make sure you have your signed permission slips ready: It's field trip time.
Filmmaker Robert Rodriguez directed "Once Upon a Time in Mexico" and "Sin City," among other things. But before that he directed a little film called "El Mariachi," a feature-length flick made for just $7,000 in Mexico. Picked up for release in the US, it grossed over $2,000,000.00.
Why do you care? You are a still photographer, after all.
Because it is a fantastic example of what can be done with a little bit of gear, almost no money and a lot of imagination. Locals for actors, water guns as props, almost no wasted footage -- this thing squeezes blood out of a turnip. He even edits as he shoots, in-camera, to make his one movie camera look like several in the final product.
Hit the jump for part two of the 10-minute film school videos, where he shows us how he did the lighting -- with just two Home Depot utility lights. And not the expensive, $20.00 quartz ones, either.
So, how do you light a movie with two HD utility lights? Very closely, obviously. Especially when you have to make them soft lights, which kills most of the (non-existant) power.
I absolutely loved both of these videos. If you are a still shooter, there is much to be learned here. But if you are even dabbling in video, this stuff is gold.
(Via FreshDV.com.)
____________________
Related links:
Pixelcadabra: D-Day On a Budget
and Basic Video Lighting Gear
Rodriguez' Book: Rebel Without a Clue
Phoenix, AZ Seminars: Registration Opens This Sunday
Registration for the March 15th-16th lighting seminars for Phoenix, AZ, opens this Sunday at 2:00 p.m. Mountain Time.
I originally hoped to be making the I-10 desert drive to open an additional LA date for this trip, but time constraints have me too hemmed in to do so. It is spring break, and we are coming out as a family to visit the Southwest. (I still hope to get to LA sometime later this year, but have no solid plans yet.)
Please note that all of the previous seminars have sold out, some within just a few minutes. And I never know how fast they are going to go. If you want to pre-read the typical seminar setup, along with reviews of past seminars, see the sign-up post for next week's Orlando seminars.
-30-
Thursday, February 7, 2008
Readers Making News
 Strobist reader Gary Cosby, Jr., who is a staff photographer for The Decatur (AL) Daily, had a nice "on assignment-style" post about using small flashes to create this illustrative portrait about a local low-budget movie director. Click on the pic, or here to read more.
On a sadder and more timely note, if you happened to look at nearly any major paper in the US today you also stood a good chance at seeing Gary photo from the tornadoes which ripped through the southeastern states on Feb. 5 and 6. Gary's photo became the iconic image for a tragedy which left more than 50 people dead, and many more lives altered.
It was lead art in the New York Times and USA Today, among many other papers. You can see his photo, and read his account of making it, here. For those of you interested in pursuing a career in photojournalism, Gary's account offers much for you to learn.
____________
 On the lighter side, my colleague Chris Assaf threw up an OA post of his own on Photo Edge today, blogging about the process of trying to sex up a shot of a keyboard with a little funky bottom light.
Chris has also started a new Photo Edge Flickr group, if you are into the PJ thing and want to mingle.
-30-
Wednesday, February 6, 2008
Experience Fashion Week Firsthand
This week marked the start of the fall fashion season with New York Fashion Week 2008, seven days of runway shows, parties, after-parties, parties after the after-parties, and all-around fabulousness. If your schedule doesn't allow you to jet off to the Apple, darling, our Fashion Week 360 channel is the one place where you can experience New York Fashion Week from all angles. For starters, we've got our very own freewheeling fashionista William Sledd in New York giving you the play-by-play:
In addition, Elle Magazine brings you into shows by top designers like Diane Von Furstenberg, Malandrino and Carolina Herrera; Ford Models takes you backstage where designers and models are furiously suiting up for the catwalk, and NylonTV takes in-depth looks at the hottest new talent like Erin Fetherston, Yigal Azrouel, and Rag & Bone.
Here's just a sampling:
The FashionWeek360 channel is updated daily, so check back to get the latest from the Big Apple. And it doesn't stop there: we'll have Fashion Week video from London, Milan, and Paris through March.
(Air) kisses,
Sadia H.
YouTube Howto & Style
Tuesday, February 5, 2008
Newest Reader Hot Shots
 I see lots of cool
 Click the pic to see it bigger, and find out how it was lit with two speedlights. And if you want to see more, click here for a slideshow of the latest Reader Hot Shots.
-30-
L102: 4.3 -- Cross Balance and Sculpt Discussion
Report from the assignment given on January 18th, in which you were asked to shoot a photo predominantly lit in one direction, and partially filled by restricted strobe coming in from another direction. This concept proved a tad elusive for many of you, but there were some cool photos made, all the same. Pix and more, après le jump.
__________________
This assignment and technique is a pretty tough thing to get, IMO. But it is one of the most useful ways to use a single flash. For instance, Joe McNally is basically doing exactly this -- selectively lighting against the ambient -- in his blog post on lighting a fence.
Seriously, if I put out an assignment for you guys to shoot a fence with a single flash, take a moment to picture in your mind what would come back. But a photo like that in the hands of a photographer who is elegant with his or her light can yield a beautiful photo.
Also: Until he starts explaining to you how he lit it, did you notice that the final photo was not really about the light at all, but the fence? It just looks pretty darn good photo of a fence, is all. When light works really well, it does not call attention to itself. Your mind just explains it away as being natural light. Only really cool natural light.
That is sculpting with restricted light. He restricted it by zooming the flash out to 105mm, which at that range is as good as sticking a snoot onto the flash.
That said, there were some cool shots in this group, too. So let's look at a couple.
Leading off is a nicely done photo that I am reluctant to post because it just reinforces that 94% male thing we apparently have going on here. (I would like to report, for the record, that I am 100% male, whereas you, as a group, are merely 94% male.)
I'm just saying.
 Anyway, here is Dat-Tuyen Nguyen's simply and beautifully lit portrait, shot in color but (IMO) looking better converted to black and white.
I really like the photo, but I might have moved the camera-right light up (in direction) a tad. As it is, it is pretty cleavage-oriented. But I suppose that is a matter of personal choice. Remember that you connote a lot about what is important and what is not by what you choose to selectively light.
(And yes, I do expect that there will be some comments -- both ways -- about this...)
That said, I think you will find that any controversy attached to the above photo pales in comparison with that of the following picture, which is by Lowell Sannes:
 You see, Lowell is busy shooting his assignment while he is also flying a Boeing-Effing-737 jet plane.
Now, I do not know about you guys, but what I like to hear from my pilot during a flight is the occasional report of the (smooth) weather that is expected ahead, meted out over the intercom in a confident, baritone-pitched voice.
And not something like, "Hey, look, Bob! Every time I do a test pop with my Pocket Wizard the nav displays go nuts!
That's right, the same guy who would prefer that we turn off our pacemakers as he prepares to land the plane is just hunky-dory with a Pocket Wizard transceiver going off repeatedly at 34,000 feet. It's good to be the captain.
Also, I would like to know: Did he actually turn the plane to position the sun correctly?
I can hear it now:
"Ladies and gentlemen, this is Captain Lowell speaking. Shortly, we will be executing a quick l'il barrel roll, so's I can nail my backlight for an important photo. Please do not be alarmed. Oh, and you might wanna buckle up...
That said, what is important in this venue is that it is a very cool pic. And it is just what the doctor ordered for the assignment. Lowell has chosen a scene defined by strong backlight and selectively filled it with restricted flash to light exactly what he wanted lit, and nothing else.
And if I may address Mr. Sannes directly:
You, sir, are the charter member of the Strobist Lighting 102 Six-Mile-High Club. That said, my URL had better not be the most recent address in the browsing history of your charred iPhone when they find it next to the plane's black box.
_________________________
Smoldering remains aside, the takeaway from this assignment should be to consider the possibility of working against the direction of the ambient light, and then working some selective light back into it to create a center of interest that is controlled entirely by you.
NEXT: 5.1: Refract and Reflect
2008 Southern Short Course Now Registering
I'll be teaching two, two-hour breakouts there on Thursday and Saturday. One is for newbs/students and the other for experienced news photographers. Two hours is short-form, compared to the usual stuff we do. But these short course weekends are fast-paced, and lots of fun.
(Bear in mind that they are geared primarily to the needs of photojournalists.)
:: 2008 SSC Schedule ::
:: 2008 SSC Faculty ::
-30-
Newb Catch-up Day
Is all this off-camera light stuff making your eyes glaze over? We get our fair share of fnugy's (as McNally would say) around here. And we can sometimes lose track of how far we have come as a group since the site began back in 2006.
Fortunately, Paul Duncan (the guy who did the Bogus Artificial Ring Flash and the strobe spotlight thingie) has put together a very nice slideshow video that really nails the basics.
Take a look if you are new. Or even if you are old. And if you haven't yet hit Lighting 101, you'll have a bit of a head start after seeing Paul's very cool slideshow. (Thanks Paul!)
__________________
Related Links:
:: Paul Duncan's Website ::
:: Paul's 'Bogus Artificial Ring Flash' ::
:: Paul's Strobe Spotlight Snoot ::
-30-
Super Tuesday -- Tune In!
Today is the biggest day in the U.S. presidential primary race so far, and you can follow all the action right here on YouTube. Check out our Super Tuesday platform to see videos from voters, candidates, and news organizations from around the country. We're featuring some of the best ones on our home page all day today.
Here's a highlight reel:
Come back to our Super Tuesday channel throughout the day as videos pour in from the 24 states holding primaries. Add your own video to the mix to have your voice heard alongside everyone else's. If you're looking for ideas on the kind of video to make, we've got some suggestions here. But most importantly -- get out and vote!
Yours,
Steve G.
YouTube News & Politics
Subscribe to:
Posts (Atom)