First, the basics.
 Every flash that you use should have two gels - Window Green and CTO, which stands for Color Temperature Orange (where to get them) nearby and ready to be used at any time. These are your bread-and-butter correction gels.
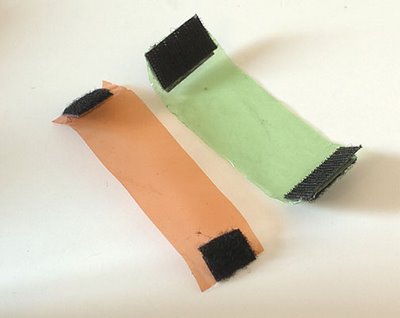
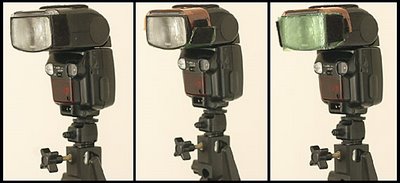
  To attach them to a flash, I cut the gels into strips and put adhesive velcro (very cheap at Home Depot, Wal Mart, etc.) onto the edges. I put hooks on one side and loops on the other, so on very rare occasions you can stack the gels if need be. But mostly it helps to be able to stack them on the side of the flash for easy storage.
 You will also be putting the "loop" side of the velcro on the side of your strobe, as shown. This will provide an easy way to attach bounce cards and light shields to keep your flash from causing glare when it is being used as a side/backlight. More on that later.
Back to light color. Florescent light is not white. It is a sickly, putrid green. If you are not gelling your strobe green to match it, objects lit by your flash will be white and the ambient-lit portion of your frame will be green. This is a problem that even Photoshop cannot fix.
The solution is very simple: You place a "Window Green" florescent gel over the strobe head. You color balance your digital camera for shooting in florescent light. You get consistent, reasonably color-correct photos, with both the strobe and ambient light coming out as (again, reasonably) correct color.
I say "reasonably," because all florescent lights are not the same color temperature. And, depending on which part of the 60hz electric sine wave cycle your shutter happens to grab from the florescent ambient lights, they will color shift on you, too.
Don't believe me? Set your camera on an interim shutter speed between 1/60th and 1/125th, such as 1/80th or 1/100th. You are trying to grab a portion of the sine wave here. Motor off ten available light frames in quick succession. See the color shifts between the frames? That's what I am talking about. Not much you can do about it, except to shoot at 1/60th (to get a whole, 60hz wave) or 1/30th (to capture two complete waves.) Not the ideal solution, but it does help.
So, you balance your strobe output level for the ambient light levels when you shoot (just like we talked about earlier) and you should get a smooth, color-corrected photo. If you run into problems, try warming up or cooling down the the florescent setting on your camera. I know my Nikon digital cameras do this very easily, and I would assume the Canon digital cameras do it, too.
Tungsten is the same process, except you use the CTO gel and balance your camera to tungsten. And again, tungsten is not necessarily tungsten. Some lights burn warmer (color-wise) and some light - especially those turned way down on a dimmer, are almost red-orange. But balancing the camera for tungsten and using your CTO gel on the flash will get you acceptably close on most all cases.
Ah, but what about the rooms that have florescent overheads, tungsten desk lamps and big, daylight streaming windows?
No problem. Just shoot black and white.
(Kidding, kidding...)
What you have to do is to choose your dominant light color and go with it. Bear in mind that tungsten and daylight mix much better than do florescent and everything else.
If the room is mostly florescent light but there is window light creeping in, close the blinds/shades/drapes and try to keep the window out of your shot, because some light will creep around whatever is shielding it at the window.
If the windows are large and/or bright (such as in a classroom) I usually just ask if I can turn off the florescent lights "because they make your skin look green in photos." Very few people object to things that keep their skin from looking green. Besides, if the window light was intense enough to be problematic, there should be enough light for people to work by.
After that you just use your flash without gels. Be aware of light levels coming from the the window and, as they say in Great Britain, Bob's your uncle.
I suspect that as our library of photo examples in "On Assignment" grows, we will be getting into using colored gels for effect. But that's for later. If you feel compelled to experiment, just try to remember that (a) that 80's-MTV-Gel-The-Heck-Out-Of-It look is so over and (b) less is more when it comes to color-gelling your photos for effect.
Next: Cereal Box Snoots and GoBo's
No comments:
Post a Comment