Tuesday, October 2, 2007

Amp Your Backlight with a Cheapo, Disposable Fog Machine

Yesterday, I spent most of the afternoon cruising my local big orange store for an upcoming "Home Depot" week here on Strobist. Yep, a whole week of cheapskate, hardware-themed DIY fun.

The goal is to have the posts pre-written for late October, so I will not have to spend my entire week in Paris attached to a laptop. I have long since considered HD as tightwad photo gear heaven. Given that, I walked in with notebook and pen in hand, ready to scrounge. Two hours later I walked out with a cool list and more new ideas than I could shake a stick at.

But this particular find was too perishable to hold until late October. Get the full details on the dirt-cheap fog machine after the jump.

(Cool, fogged-up backlit photo by mwreeve)
_______________________


1983 Called. They'd Like Their Lighting Back.

Nothing makes hard, strobed backlight look cooler than a bunch of smoky fog wafting around, making those cool beams and layered tones. A little '80's if done too over-the-top. But lotsa possibilities, all the same. Sadly, the professional model fog machines are mid-three digits to start.

Fortunately, America's insatiable appetite for tacky, over-the-top Halloween decor is your temporary ticket to a fog machine for just $29.95. But as you might imagine, at that price there are catches.

Number one, they won't be around long. HD has them in the pagan holiday tacky decor section. And that opportunity is fleeting, for obvious reasons. You can also apparently get them at Wal*Mart, Michaels, and a few other companies I have never heard of. Ditto the Halloween-themed, fly-by-night stores at your local mall.

Number two, at $29.95 it does not come with the water-based fog fluid. So that'll set you back a few more bucks.

Finally, (and this is why I refer to it as "disposable,") the fluid can reportedly sometimes get too thick and gum up the machine. But it is water based, so my game plan is to dilute it a little with water and thicken it back up juuuust until I get decent fog. (I like to tinker.)

In fact, your local Home Depot may or may not carry the fog fluid just for that reason. So call around to find out who has the whole set before you waste the gas.

UPDATE: Check out the anti-clogging solution by RootyB in the comments.

Hey, it's $29.95. If it holds up for one good shoot it's worth it for a chance to play with smoky backlight. (I'll bet Keith Taylor would have liked to have it for that fireman shot.)
_______________________


(Fog Machine Product Page, at Gemmy.com.)

Always Happy to See This:

From a comment I just moderated on last Saturday's speedlinks:

Anonymous said...

Newbie question, but...
What would you use black straws for?


Far from being annoying -- it actually brought out a chuckle -- I love these little reminders that new people are discovering this stuff every day. We have our own little language of geeky, shorthand, DIY lighting terms and I am more guilty of forgetting that than anyone.

To Anonymous:

You can always type relevant terms into the search box at upper left, as in this search for black straws, which would have gotten you into range pretty quickly (after a short scroll.)


FWIW, Blogger's built-in search is limiting in some clunky ways, as is their tagging system. So I am in the process of integrating a more comprehensive Google search into the site and posts.

-30-

Lighting 102: Assignment - Balance

We have spent the last three weeks studying light balancing and producing photos in fairly restrictive exercises. We have a lot of people doing the work it takes begin to understand the complete and subtle controls you have over the dance that happens in your photos between strobe and ambient.

You have shot into sunsets, flashed against harsh sun and built up your backgrounds with ambient indoor light. These were three very specific techniques, but they all point to a better understanding of ambient/flash control and balance.

Later, we'll be playing with more than one strobe at a time. But for now, this balance stuff should start to be getting intuitive if you are using one strobe.

I want to detail the techniques for balancing flash and ambient as they relate to actual camera operation, and this send you off on an assignment with a little twist -- and a nice, long deadline.

(More after the jump.)
_______________________


Controlling Your Light from the Camera

Assuming just one flash and ambient light, there are only three combinations with which to control the two variables.


1. To alter flash and ambient levels together:

Remember, flash cares about the aperture and ambient cares about both the aperture and the shutter speed. So to lighten or darken both at once, we adjust the aperture.

If, for instance, our whole scene (flash and ambient) is too dark at f/8, we could move to f/5.6. This would lighten everything by a stop -- flash and ambient alike. Conversely, we could darken the entire scene by going from f/8 to f/11.

2. To alter the ambient level but not the flash:

As we said, flash cares about aperture and ambient cares about both aperture and shutter. So to control the ambient only, we will adjust the shutter but leave the aperture as is. Assuming you are within your sync speed, this will alter only the ambient-lit portions of your photo, as in our coffee table camera shots.

3. To alter the flash-lit area but not the ambient:

This is the most complicated of the three, but only as much as "chocolate/vanilla twist" ice cream is more complicated than either of its components.

Flash cares about aperture, and ambient cares about both aperture and shutter speed. So to alter flash only, we are going to adjust the aperture (which alters both) and compensate for the ambient by adjusting the shutter the other way.

(Sound of 2,000 heads exploding.)

This is not hard at all. Say our ambient is fine, but our flash is not bright enough. Aperture is at f/8 and shutter is at 1/60th, for the sake of argument.

So we open the flash up to f/5.6, which brightens the flash-lit area -- and the ambient, too -- by one stop. Then we close down the shutter to 1/125th, which brings the ambient exposure back to its original exposure value. (1/125 @ f/5.6 = 1/60 @ f/8, right?)

Piece of cake.

To darken only the flash but preserve the ambient exposure component, we would close down the aperture and open the shutter speed by the equal amount.
_________________________

Three slick moves which add up to total control of your lighting world. All in manual. All from the camera.


And Now for the Twist

Everyone will be doing this assignment in the nude.

No, no -- kidding. But I had you for a minute, huh?

No, the twist in this assignment is akin to the difference between algebra and physics. Stay with me on this one.

Algebra is pure math -- or pure torture if you were not a "math person" when you got to algebra. Math as an end to itself. ThisCrapWon'tEvenHelpMeBalanceMyCheckbook math. Math for math's sake.

Whereas physics is math with a purpose. Physics is math getting something done. We are talking "1/2 AT squared tells me where the water balloon will land" math. And that's cool. And your third assignment will hopefully get something done, too.


Assignment #3: Balance

Two of my friends, Rissa Miller and Nathaniel Corn, are both photographers who also happen to be married to each other. A few weeks ago, Rissa sent me an email about a project that she and Nathaniel had been working on along with two other people who I have not yet met. It's called the Thank You Calendar. It is a calendar designed for (and to raise money for) members of the armed services who are recovering from wounds sustained in a very politicized war.

Politics and opinion are the last things on Rissa's and Nate's mind. In fact, they make it a point for the Thank You Calendar to be politically neutral. Which makes this project all the more special, IMO. They are not doing the calendar for the war, or against the war. They are doing it for the people who are caught up in the war. They are neutral, yet they are trying to do some good. (Boy, that's a 180 from most people with a "for" or "against" stake in this thing...)

One hundred percent of the money raised by the Thank You Calendar will go to wounded service members recovering at Walter Reed Medical Center and to their families. The money will go to help fund visits, and buy personal items that they may need as they recover, etc.

What a neat idea. Isn't it amazing what a few people with the ability to make cool pictures can dream up? And here's the thing: There are easily 10,000 people reading this post who are working at this level, photographically. The trick is to look beyond taking pictures of, say, a camera on a coffee table and figure out how you can make the world a little better place with your camera.

So, here's your assignment with the twist:

Photograph someone in mixed flash and ambient light, using what you have learned in the Balance section to control your variables in the manner that you choose. But more important, produce a photo that makes a difference to someone. How it makes a difference, and for whom, is completely up to you.

Try to look beyond the technique to make a photo that is special in some way. Do not get so hung up on the technique that you fail to make a real picture.

Maybe there is a local organization (like a charitable foundation) whose director could use a nice portrait for an annual report.

Perhaps there is a family you know -- a single parent facing tough economic times -- who would love to have a high-quality family portrait for the holidays.

Maybe there is a centenarian in your town that deserves to have their achievement marked with a photograph.

The specifics do not matter. The magnitude of the result is not what is important. The idea matters. And the idea is, what a waste it is to be learning to do such great work only to have it sit on a Flickr page as an end-all.

If you don't want to do this, it is completely your choice. But in the same way it would be a waste of your ability to do a fine photo of a mannequin as an exercise, it would be a wasted opportunity for me not to at least attempt to harness the wonderful pool of talent and goodwill we have built together in this community in such a way as to do some good.

You want time? You got time. The single photo is not due until November 3rd. That's plenty of time to put some thought into it and pull off something neat. We'll take a little breather on the L102 new material to give you time to concentrate on applying what we have learned to an assignment with a little more depth and potential than he first two had.


Here are your tags:

Strobist
Lighting102
Assignment
Balance

and for your best shot, include the tag:

Final

You can see all of the take here. You can see the final edits here. Discussion is here -- and please use this as a clearing house for ideas. You are spread all over the world -- people from 176 countries logged on in September. Duplication of good ideas is fine, even encouraged.

It's a really good feeling to make a good picture. It is a much better feeling to make a good picture that makes a good difference. Thanks for your consideration.

And if you have time, please take a moment to check out the Thank You Calendar as an example of what a few photos can potentially accomplish.


NEXT: Balance Assignment: Discussion

Is Your School Geek or Chic?

A while back Threadbangers, that hip HowTo channel from Florida, showed us how to turn a T-shirt into a hoodie and how to transform a guitar strap into a belt. Now thread heads Rob and Corrine are ready to take it to the next level. Threadbanger wants to give one YouTuber and his/her high school a fashion makeover. That's right - these DIY'ers want to get a glimpse of your school, your friends, and your classmates and see if they're in need of some major fashion help.


So do you think your high school could use some DIY fashion guidance? Send in videos (with permission from your school, of course!) and show Threadbanger your fashion faux pas. Who knows? You might be lucky enough to have these experts show you what it takes to turn your style-challenged homeroom into a couture runway.


Your Novice Craftster,

Sadia aka
Sublinx

YouTube Howto & DIY

Monday, October 1, 2007

Paris Seminar Update

If you are attending the Paris 10/27 workshop, please make the jump for the latest info. If not, save yourself a click.
_____________________________

The Paris seminar has sold out. And, I am happy to report, it did so at a pace that allowed everyone who wanted to come plenty of chance to sign up. Perfect.

The sold-out status allows me the ability to have the maximum flexibility on the refund deadlines. I am well aware of the fact that life happens, and sometimes it is not always within our control. And I do allow for that in the scheduling process.

If circumstances prevent you from coming on the 27th, please make every effort to email be before the end of the day on Oct. 18th to secure a full refund, no questions asked.

If you were not to find out until after the 18th that you would not be able to attend, you have two options: I will make a 50% refund between Oct 18th and Oct 24th, or you may choose to dispose of your own ticket at any point after the 18th.

I would only ask that you not charge more than you paid. That would totally go against the vibe of the whole site. If you have problems, please email me and we can work something out.

As before, please direct all questions and discussion to the Paris seminar thread on Flickr.

Finally, I am happy to see so many familiar names on the roster. I am very much looking forward to seeing all of you.

-DH

Readers Shoot Back: Keith Taylor

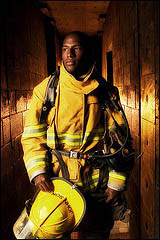
In producing a series of portraits for Gwinnett Technical College in Lawrenceville, GA, Strobist reader Keith Taylor chose to use a two-light-zone setup, including gelled backgrounds, to create visual continuity over a series of photos.

The series is a good example of how lighting design can create a unifying theme for portraits shot at different times, with different subjects, and/or in different locations. I want to take a look at his fireman trainee portrait as an example, but you can see his entire Gwinnett Tech set as a slideshow here.

(More on making the fireman shot after the jump.)


Not Scared of the Dark

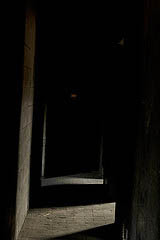
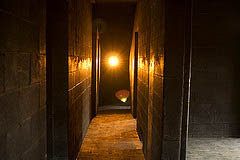
Here's the setting, a place that would make many newer, available light-oriented photographers cringe. And Lord help you if you are only sporting on-camera flash. But someone who is comfy with lighting -- especially working background flash against foreground flash -- will quickly see how to make good use of the dark environment.

A dark room is a very efficient canvas on which to add light, because you can do a lot with a little. The reason is that you do not have to overcome high, pre-existing light levels to get the effect that you want. In fact, one of the first things I will do when planning light for a room is to see if I can turn the ambient light off.

Not to say that Keith wanted to ignore the ambient light -- far from it. He chose his aperture/shutter combo to correctly expose the ambient coming in on the floor at bottom right. This will help to separate the camera right hand and camera right leg from the background.

The first light he adds is a Vivitar 283, aimed right back at the camera and gelled with two CTOs to get a super-warm look to the background.

(Cue the Beavis voice: "Heh-heh.. Heh-heh... Fire.. Heh-heh...)

With one flash and two gels, he has taken a long, dark hallway and connoted fire. Why two CTO's? Because one would not be enough for the look he wanted, which was vibrant, off-the-scale warm. You can stack them, you know.

The light is flaring back into the camera, but that's okay. Because Mr. Firefighter Trainee is going to block it in a moment.

Keith already has a working aperture (whatever it happens to be is pretty arbtrary) pulled from the no-flash available light exposure needed to make the continuous-lit floor section correctly exposed. Let's stop here for a moment and see how he could control his flash without leaving the camera.


A Thinking Photographer's Remote Control

Say the flash is a stop too hot and Keith needed to dial it back down one stop for the effect that he wants. Let's also say, for the sake of discussion, that his chosen ambient exposure is 1/15th at f/4. What could he do to only adjust the exposure of the background flash without leaving the camera?

Well, the flash cares about the aperture, and it is one stop too hot (in our little hypothetical scenario) at f/4. So, to knock it down a stop, all you have to do is to expose the scene at f/5.6, right? But moving to 1/15th at f/5.6 is gonna drop your ambient floor tones down a stop, too. So, to compensate for the fact that we have bumped the aperture from f/4 to f/5.6 to knock the flash down, we also change the shutter from 1/15th to 1/8th of a sec.

Now, with a quick settings change, the floor is getting exactly the same exposure (1/15th @ f/4 = 1/8th @ f/5.6) but the flash's exposure has been lessened by one stop. Neat, huh?

I'm telling you: You do not get a physique like mine by unnecessarily walking all the way down that hall to adjust a flash. I'll dial the front flash up or down as my final exposure tweak. It's only a few steps away.

(Now, where are those donuts we got to fuel the day's shoots?)

Remember, to check your background flash light level to see if it even needs adjusting, you would simply turn your hand into a stand-in for the firefighter and hold it between you and the background flash. (I use the hand model thing a lot.) This way you see how the light will look wrapping around a gobo/subject, as it will be in the final image.

(You know you did it, Keith. Where's that photo!)


Now, Light the Front

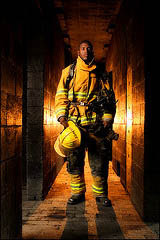
Next, you add your firefighter and adjust the power output and/or distance of the foreground flash until he he is correctly exposed at your chosen shutter/aperture combo. (But all that really matters for this part is the aperture.) The foreground flash, BTW, is another Vivitar 283 shot into a 60" umbrella at camera upper left.

Here's another frame from the shoot. You can also see where he is hiding the front flash -- in the camera-left doorway. I actually like this one better than the tighter version up top. I think it has more of a "hero" connotation. (What do you guys think?)

But that is just a subjective choice. What is not subjective is the fact that that Keith clearly knows how to create and control an environment with just a couple of 283's.

(Thanks much for the process shots, Keith.)

_____________________________________________

Related reading - On Assignment: Second Light Creates Tension

Do you have a cool, lit shoot for which you also made process/setup shots? Hit us with a link in the comments.

Hey, Directors! Ready to Hit the Big Screen?

Welcome to YouTube Project Direct, our first film competition and – drumroll, please – our first international contest ever!


If you’re ready to turn your craft into your career, direct an original short film incorporating three key elements, outlined for you here by award-winning filmmaker, Jason Reitman, and you could get the exposure you need.


Submit your film by November 9, and Jason and a panel of industry experts, including studio executives and Hollywood agents, will review your films and choose the top twenty. Starting November 24th, the YouTube community will vote for a final winner.


Check out the Project Direct channel to see what’s up for grabs!


Good luck!

Sara P. aka TheStoryBoard

YouTube Film