Monday, March 20, 2006

On Assignment: Wind Tunnel

While shooting a story on the wind tunnel at the University of Maryland's Clark School of Engineering, I wanted to get a photo of the giant fan that creates the 100mph+ winds for studying airflow around objects.

The available light was depressingly crappy - about 1/10th of a sec at f/2.8 (ASA 400) with typical institutional sodium vapor as the color temperature.

So, to separate the blades and draw the viewer into the frame, I stuck a Nikon SB-28dx on a small light stand and set it to 1/4 power. Remembering that the shadows always point to the light source, the flash is obviously behind the bottom blade. The flash is pointed directly at the camera, but hidden by the blade.

(I do that a lot, actually. In a dark situation, mount the flash backwards on the stand then turn the head back around towards the camera. The ready light will act as a guide to help you keep something between you and a backlighting flash in a darkened room.)

While the sodium vapors looked pretty bad at the correct exposure, they gave a neat, warm color cast when underexposed by about a stop and a half. Always consider altering the ambient portion of the exposure when faced with a light color you cannot easily balance for in camera. What looks terrible at the proper exposure might look cool and dramatic when over or under exposed.

So, now shooting at 1/30th at 2.8 (wide open and getting a saturated ambient color) I adjusted the output of the strobe by trial and error and arrived at 1/4 power as the best look on the backlight. Love that little digital polaroid on the back of my digital camera now. (I no longer carry a flash meter.)

The lens angle adjustment of the strobe was set to 24mm to get a nice wide throw of light in the cramped area.

I like this solution because the one small back light is accomplishing a lot of things. It is providing a hotspot to lead the eye into the photo. It is separating the person walking toward the fan. It is providing a nice spray of leading-line shadows coming from the fan blades, the braces and the guy. It is lighting the floor, which shows up reflected in the bottom of the motor housing.

And, most importantly, it is providing another light color and level on which to base my exposure, which allowed me to underexpose the sodium vapors to use the ambient light's color to my advantage.

Camera: Nikon D1h
Lens: Nikkor 17-35 zoom @17mm; 1/30 at f/2.8
Flash; Nikon SB-28; 1/4 power; 24mm throw
Sync: Pocket Wizard remotes

Next: Abstract Concrete

On Assignment

Welcome to On Assignment, where you can build on your Lighting 101 skills by learning exactly how real-world assignments were lit.

The object will be to explain the process of making the photos as clearly as possible. But if you have worked your way through the Lighting 101 section, you should be able to reverse engineer the light on most photos just by looking at them.

Try to test yourself, then read the copy for specifics.

Wind Tunnel
Abstract Concrete
Archeologists
Cicada
Star Gazer
Real Estate Developer
Blind Snoot Portrait
Conference Room Quickie
Lighting Prep Basketball
Taming Harsh Sunlight
Big Gym, Little Lights
Light the Little Stuff
Thinking Outside of The Box
Designing a Backdrop
Lighting for Detail
Guy on a Boat
Dealing with TV's and CRT's
Simple Wall/Snoot Portrait
Make the Ambient Work For You
Use a Second Light to Create Tension
Womens Lacrosse Cover
Lacrosse Cover, v2.0
Free Custom Backdrops: Using Flash into a Sunset
Ant Upton: Soccer Preview Shot
Robert McNary: Shoot Your Kid
Developing an Idea, Part 1: Compact Fluorescent Bulb
Developing an Idea, Part 2: Compact Fluorescent Bulb
5-Minute Test Shot
Shiny, Pretty Things
Pool Portrait
Strobe on a Rope
Tupperware and Trash Bags, Pt. 1 of 3
Tupperware and Trash Bags, Pt. 2 of 3
Tupperware and Trash Bags, Pt. 3 of 3
Soup Up Your $10 DIY Macro Studio
How To Light A Comet
Test Driving the DIY Softbox Grid Spot
Medical Illustrator
Fourth and Long? Punt With a Plant
Shade is Your Friend
Sometimes it's Not the Photo, it's the Process
Zebra Fish and Zygotes
David X. Tejada: Kicking Butt with Small Flashes
Stainless Steel and Cookies
How to Photograph Christmas Lights
Hit for Average
Always Look for a Detail
Book Club Illustration
Lighting a Large Interior
Found Backdrops, Pt. 1
Macaroni and Cheese
Speedlighting a College Gym
Special Q&A: Speedlighting a Gym
Flavored Vodkas
Light the Details
Spring Arts Guide
Munchies
Hero Fan
Spring Desserts
Group Shot: 2 Speedlights, 34 People
Michael in Paris
Eke in Paris
Steve at Google
Nest Egg
Peter Yang: Admiral William Fallon
Golf Feature
Controlling Daylight, Pt. 1
Night Chopper, Pt. 1
Night Chopper, Pt. 2
Fifty Years
One-Light Real Estate Shoot
Reluctant Poet
WiMAX
Manil Suri
Monteverde Institute
Planes and Arrows
Prep Quarterback
Shooting for Social Media
STB: John McIntyre
Climber Hands
Glass Menagerie
Trip Jennings
STB: Gus Sentementes
Earth Treks Pt. 1
Earth Treks Pt. 2
Earth Treks Pt. 3
Gas Station Tacos
Nathan Carlisle
The Soprano
STB: Sian Meades
Guitarist Mark Edwards
Betty Allison
Cellist Caleb Jones
STB: J.D. Roth
Nataniel Welch, Men's Journal
Bionic Arm
Summer Reading
Stink Bugs
Radio Silence
Newspaper Man
David Tejada
Bullet-Proof Glass
HoCoPoLitSo
Frickin' Lasers
Brian England
Inside the Black Box
Plain and Simple Light
Martin Prihoda for Cosmo
Miller Mobley: Chaplain
Finn O'Hara: Mixing Light
John Keatley: Best in Show
Chris Crisman: Self-Investment
Brad Trent: Ocean Master Pt. 1
Brad Trent: Ocean Master Pt. 2
Concert Pianist
Hi-Def Asparagus
Mathieu Young, Moonlighting

Lighting 101 - Ball Bungees

OK, can I tell you how much I am starting to like these things?

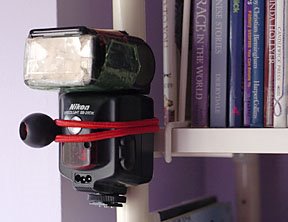
Being a guy, I realize I am genetically predisposed to liking bungee cords. But the thing about the ball bungees is that they have no metal hooks to scrape up your gear. Sweet.

Fellow Baltimore Sun photographer Karl Ferron turned me on to using bungees to secure a flash to a variety of things. On the rare occasion when I am caught without a light stand, these (and a little placement creativity) will get the job done in a pinch.

You just stretch it around whatever you want to fasten you flash to, aim the head, and start shooting. You can double them up for fastening flashes to thicker items, too.

They do double duty by holding my umbrella to my light stand when I am packing gear. They weigh next to nothing. They cost next to nothing - I paid $1.93 for a four-pack of 8" Ball Bungees (which is a very useful length) at WalMart. So get plenty.

They are good for fastening Pocket Wizards (we'll get to those soon) to a strobe, too.

Next: Umbrella Stand Adapters

Lighting 101 - Super Clamps

While stands are usually the best choice, they aren't the only way to hold a light in a specific location. And other options take up less room in a lighting kit, too.

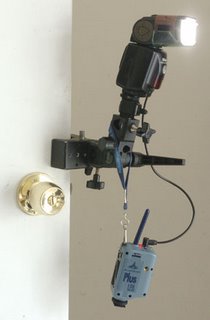
The favorite of most shooters is the "super clamp." It can latch onto just about anything, provided the thickness is a couple inches or less.

The bent arms of the clamping jaws make it particularly appropriate for clamping onto a variety of shapes. Pipes, railing, doors, shelves, tables, tree branches, electrical conduit running up the wall in a high school gym (not too tight...) are all no problem.

It comes with a stud that will accept a ball head or an umbrella stand adapter, too. So mounting your light is very easy. They are about $22.00, and every photographer should have at least one.

With the right accessory, they can hold remote cameras too -- or fix a roll of background paper to a light stand. A super clamp is one very useful piece of gear.

Next: Ball Bungees

Sunday, March 19, 2006

Lighting 101 - Light Stands

Now that you have decided to get the flash off of the camera, you'll need some place to put it. And for most situations the best choice will be to attach it to a light stand.

Most any light stand will safely support a shoe-mount strobe. So look for a stand that that is reasonably priced, can stand up to some abuse and is light and easily transportable.

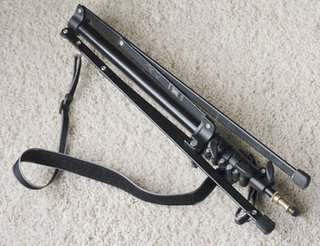
For a compact, 5-section, six-foot stand, I like the LumoPro LP605 ($40) stand. I have half a dozen of them, and they are my go-to stand for small flashes. If you do not need the compact size for packing, you can save $10 and get a standard eight-foot stand for $30.

Both of these stands are sturdy and reasonably priced. If you are not going to put a stand through a hard duty cycle, there is no reason to spend a lot of money. Stands are not in the optical chain. They hold up the flash -- and a very small flash if you are using speedlights.

The 5-section compact stands are my workhorse (I use them regularly) because they fold up to a very compact package and will support a shoe-mount strobe just fine. But if you are looking to get a little extra height and are willing to forego the ultra-compact folding advantages of the compact stands, you have many good choices to suit just about any budget.

The second example, for instance, is a sturdier, taller, general purpose stand will double as a support for larger strobes when I need it, but does not fold as compactly because it has only three sections. There are plenty of good choices. But if you are shopping price, make sure the stand is a full-sized version, and not just a short "background" stand, though.

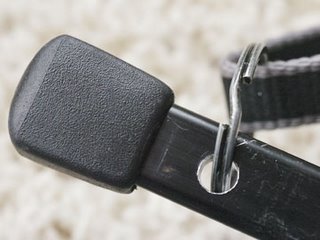
Besides extreme portability, another reason that I like the 5-section stands is that they use solid aluminum legs to save space. This means that they can be easily drilled (1/4" hole works fine - see detail photo) to take an O-ring so you can attach a strap. This is a great setup, as it allows you to just throw the stand over your shoulder as easily as carrying another camera body.

You can easily attach a strap to a tubular-legged light stand, too. Just use a little gaffer's tale and 3 or 4 inches of a straight section of clothes hanger wire with a little "bump-out" bent into the middle of it. Use needle-nosed pliers and gaffer tape the straight parts to the stand legs. Hook the O-rings to the middle parts.

One advantage of stands other than the compact variety is that it gives you more choices on the umbrella, which we will talk about later. The 5-section, small-folding stands are pretty close to the same size of the double-fold umbrellas, so they travel great. But if you get a normal-sized stand, you have a much wider choice of umbrellas to choose from.

(It would make very little sense to get a compact-folding stand and bungee it to a full-sized umbrella, or vice versa.)

Whichever way you go, either version will be very functional. TI use the compact stands most of the time. But if you do not need that Nth degree of portability, the normal stands and umbrellas will give you a more sturdy support for less money.

Next: Super Clamps

Lighting 101

Intimidated by the idea of off-camera lighting?

Don't be.

We are pretty much starting from scratch, so no worries. The first posts will be about what kind of gear you will need to do the minimalist strobe thing.

When we are done having our way with your wallet (remembering that light gives you far more bang-for-the-buck than does fast glass or the latest digital camera or 300/2.8) we'll move into basic technique. And after that, we'll keep it going with periodical essays and ideas on how to improve (or refresh) your lighting ability.

When you've worked your way through the basics of designing your light kit and learning how to use it, make a point to browse some of the examples in the "On Assignment" section. Those will be updated constantly, too. So keep checking back.

You will likely have some questions along the way. Sadly, it is not possible for me to take the time to personally answer all of the one-to-one lighting questions that pop up. So try to resist asking them in the comments section. The only people reading this behind you are the people who are, well, behind you.

You will find the one-to-one knowledge bank you seek in the Strobist Group on Flickr. There, you can ask away and get the diversity of response that you need. These are the lighting grad students, so to speak. They know this stuff, and are very enthusiastic about sharing their knowledge.

But please do your part and be considerate enough to search the Flickr group threads for relevant keywords in your question first. You are probably not the first person to ask. Or the tenth. Just sayin'.

Most of all, remember to have fun and learn to make some cool light.


UPDATE, Feb. 2, 2008: For a very nice head start into Lighting 101, take a couple of mins to watch this informative little slideshow.

It is by Paul Duncan, whose site you can see here.


Lighting 101 Series

(If you start with the first one, they are linked in order to each successive lesson.)

Two Things Your Flash Needs to Have
Traveling Light
Light Stands
Super Clamps
Ball Bungees
Umbrella Stand Adapters
Synching: PC Cords and Pocket Wizards
Building a Pro PC Cord, Pt. 1
Building a Pro PC Cord, Pt. 2
Soft Light: Umbrellas
Soft Light - Wall/Ceiling Bouncing
Bare-Tube Style Lighting
Hard Light - It's Better Than You Think
Balancing Flash Intensity With Ambient, Pt 1
Balancing Flash Intensity With Ambient, Pt 2
Using Gels to Balance Light Color
Cereal Box Snoots and GoBo's
Textural Lighting for Detail Shots
Cross Lighting
Back Light as Main Light
Headshot in a Corner
Lighting for Glasses
Long-Throw Hard Light
Reverse Engineering Other Shooters' Light
Know The Flash
See The Flash
Be The Flash
Don't Let Good Light Ruin a Photo
Keep a Lighting File

Lighting 101 - Traveling Light

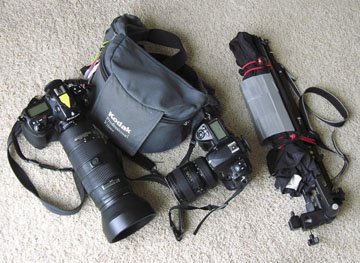
Everyone is different with respect to the gear they choose to take a given assignment. But a news photographer, for example, typically carries two digital bodies, one with a fast wide zoom and another with a fast tele zoom. This gives backup redundancy for the failure of critical items: the camera and either lens. (The zooms cross over in the portrait range, so you could be down a camera and a lens and still be mostly okay.)


Add to that a small waist pack with a strobe and a 50 (either an f/1.4 for speed or a maybe a macro depending on the assignment in my case) and you have a very capable setup. But with the addition of a few small, light items, you can add to it the ability to easily use light off camera on any given assignment.


The idea is to incorporate the gear into your standard setup so you will always have the ability to use better light. The big studio flashes are nice (and I do use them) but they don't do much good from inside the trunk. Or under the bed. If you have the light with you, you'll be more inclined to use it. That is the whole philosophy behind learning to better use the shoe-mount strobes. They are always there. If you get in the habit of using them more effectively, you will always be ready to add light to a situation when you need it.


The first photo (up top) shows the typical two-body, two-zoom setup and small waist pack.


The second shot shows that with the addition of a little bit of gear you have the added ability to use light off camera. You can create hard, soft or bare-tube-style light, with a full beam spread or very tight throw. It can be balanced for flourescent, daylight or tungsten ambient light. The light can be positioned with either a stand or a Super Clamp. Not much difference in weight. Huge difference in ability.


The light stand is a compact, five-section model, modified (drilled) to have a strap. I love these 5-section stands because they break down very small and ride on the shoulder as if they are not there. It is topped by a standard umbrella/stand adapter with a shoe mount. "Ball-Bungeed" to that is a full-size stowaway umbrella that double folds for easy transport. The umbrella is stuffed inside of a homemade folding snoot made out of gaffer's tape and the cardboard from a box of Frosted Flakes.


(More on all of these individual pieces of gear soon.)


In the waist pack is a set of Pocket Wizard remotes that will allow me to trigger the strobe wirelessly from up to several hundred feet away. I keep some small items, like a Super Clamp, small flash diffusor and some gels there, too. The ball-bungees holding the umbrella to the stand also double as clamps.


This gear suffices for easily 90% of the assignments I shoot. Here are some single-light examples shot right from this kit. All open in a new window which you can then close to stay inside the Lighting101 thread:


Backlighting in a giant wind tunnel

Lighting archeologists in full sun

A quick, dramatic indoor biz portrait


And I can comfortably walk a couple of miles with it, if need be. I also can easily shoot with either camera with the lighting gear hung from my shoulder.


The sooner you get the "less-is-more" philosophy about how much gear you carry around, the less likely you are to be popping Vioxx for your back and joint pain when you are 40.


Next: Lighting 101 - Light Stands